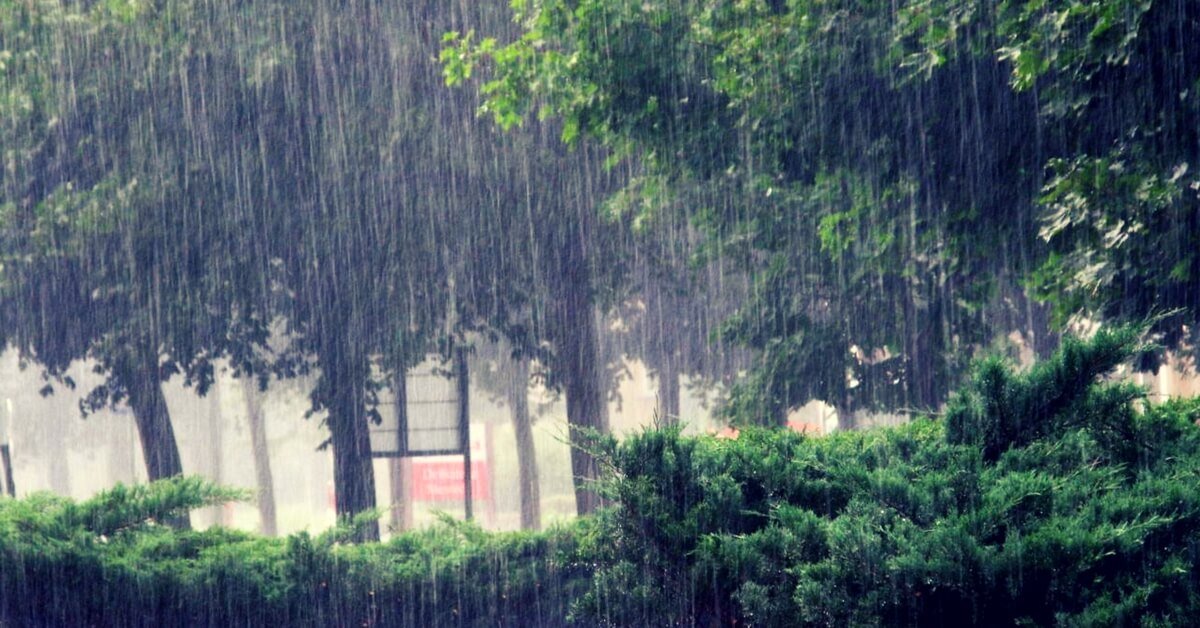
Are you looking to harness the natural power of rainwater to boost your self-sufficiency? Setting up a rainwater harvesting system is one of the most practical ways for any prepper to conserve water and reduce dependence on mains supply. It’s not only an environmentally friendly move, but it also offers peace of mind knowing you’ve got an immediate source of water, particularly crucial in times of scarcity.
This guide will walk you through a comprehensive, step-by-step process to set up a rainwater harvesting system. You’ll learn the different types, from direct pumped systems to gravity-only setups, and understand which might be the best fit for your needs. As simple or as advanced as you need it to be, you’ll have the know-how to start collecting and using rainwater efficiently in no time.
By the end of this post, you’ll see how easy it is to start taking advantage of one of nature’s most precious resources right from your own property. Ready to get started on your journey towards a more sustainable lifestyle?

Post Contents
ToggleUnderstanding Rainwater Harvesting Systems
Rainwater harvesting involves collecting and storing rainwater for later use, often helping to reduce water bills and conserve mains water. To select the best system for your needs, it’s important to understand the different types of rainwater harvesting systems available.

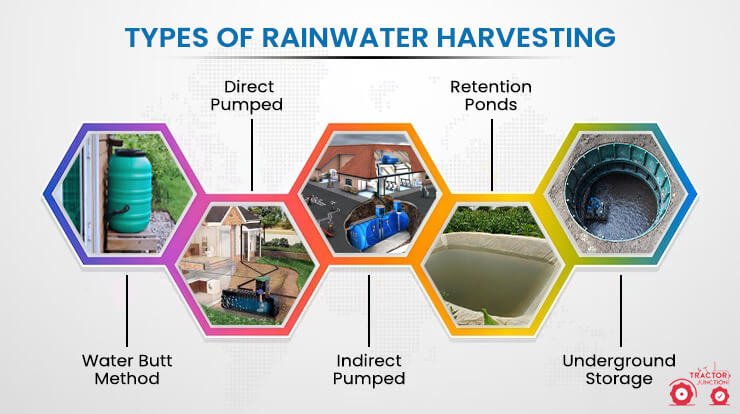
Types of Rainwater Harvesting Systems
There are various systems you can install, each with its own benefits and methods of operation.
Direct Pumped Systems
Direct Pumped (Submersible)
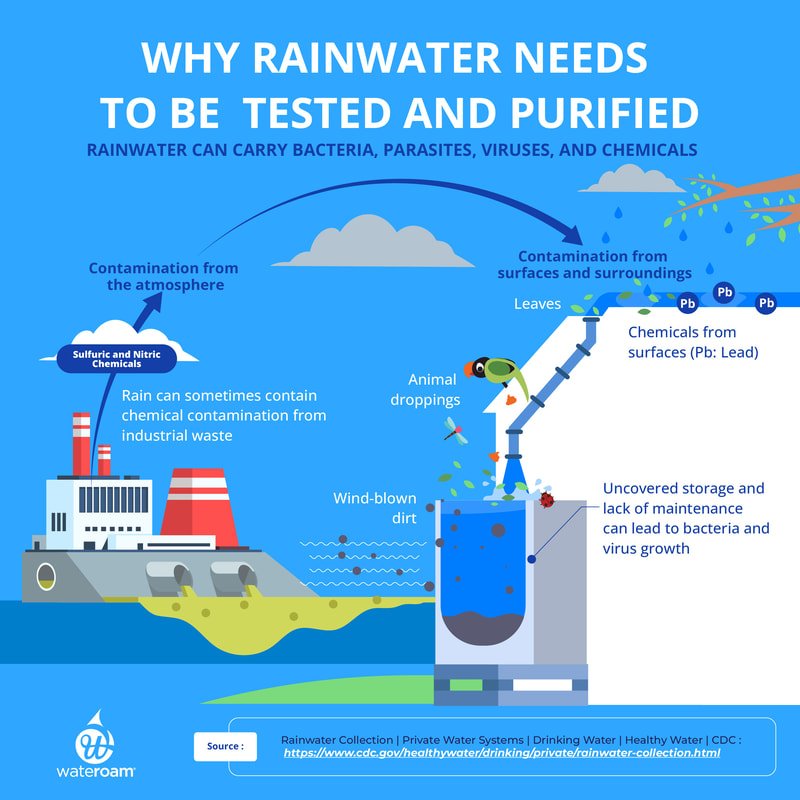
In a direct pumped system, a submersible pump is placed within the underground storage tank. The rainwater is directly pumped to household uses like toilets or washing machines. The system is straightforward and typically easy to install, making it extremely popular for homes. If the tank gets low, mains water can be added automatically to keep it running.
Direct Pumped (Suction)
Unlike the submersible system, the suction-based direct pumped system has the pump placed inside the house, usually in a utility room. This setup manages the mains water backup conveniently without needing to send mains water to the tank.
Indirect Systems
Indirect Gravity
In this system, rainwater is pumped to a header tank situated at a high level, from where it then uses gravity to supply the various outlets. This method ensures the pump only operates when the header tank needs filling, saving energy. The mains water is directly fed to the header tank without loop water to the main tank, making this a more energy-efficient option.
Indirect Pumped
This system is similar to the indirect gravity system but with added flexibility. The header tank can be located at any height within the building. A booster pump provides pressure to the outlets, ensuring a consistent supply regardless of the tank’s position. This system is suitable for larger buildings that require variable flow and pressure levels.
Gravity-Fed Options
Gravity Only
In rare situations, rainwater collection can rely solely on gravity. The system needs to be carefully located with the collection tank below the roofline but above the outlets. This arrangement means no energy is required to transfer the water from the tank to where it’s needed, making it an ultra-efficient option. However, due to setup constraints, this method is less common.
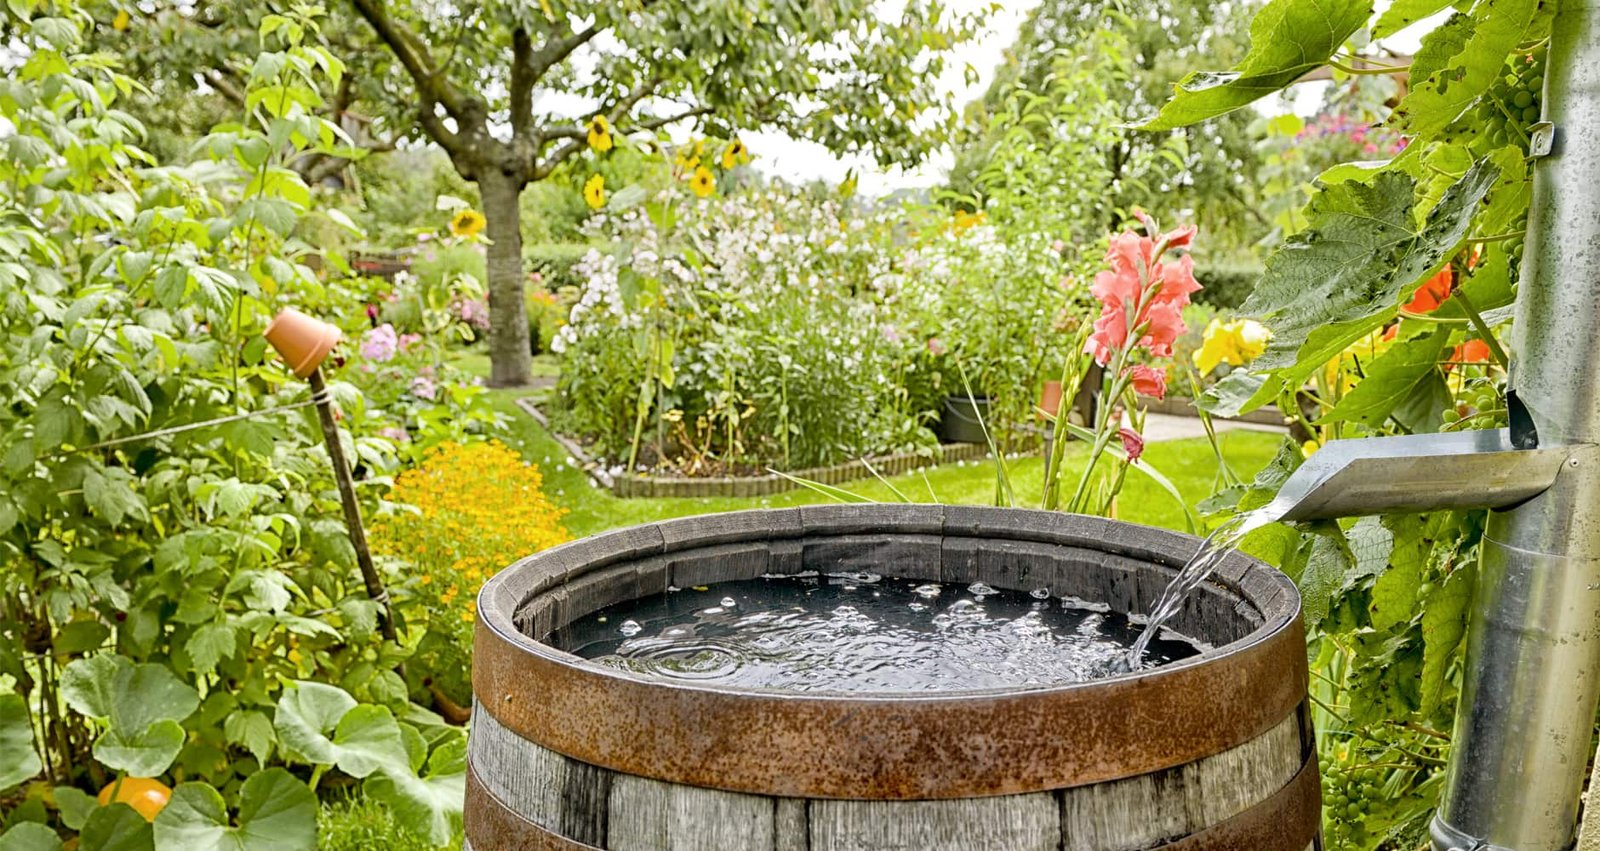
Water Butt
For a simple solution, many opt for a water butt. Rainwater from the roof is directed into a storage container for use in garden irrigation. It’s an effective way to reduce the use of mains water in garden care and can be paired with a rainwater filter to ensure better water quality.
By understanding the various types of rainwater harvesting systems out there, you can make an informed decision on what best suits your needs. Each system has unique benefits, so choose one based on your specific requirements and space constraints. Read more about the different methods here.
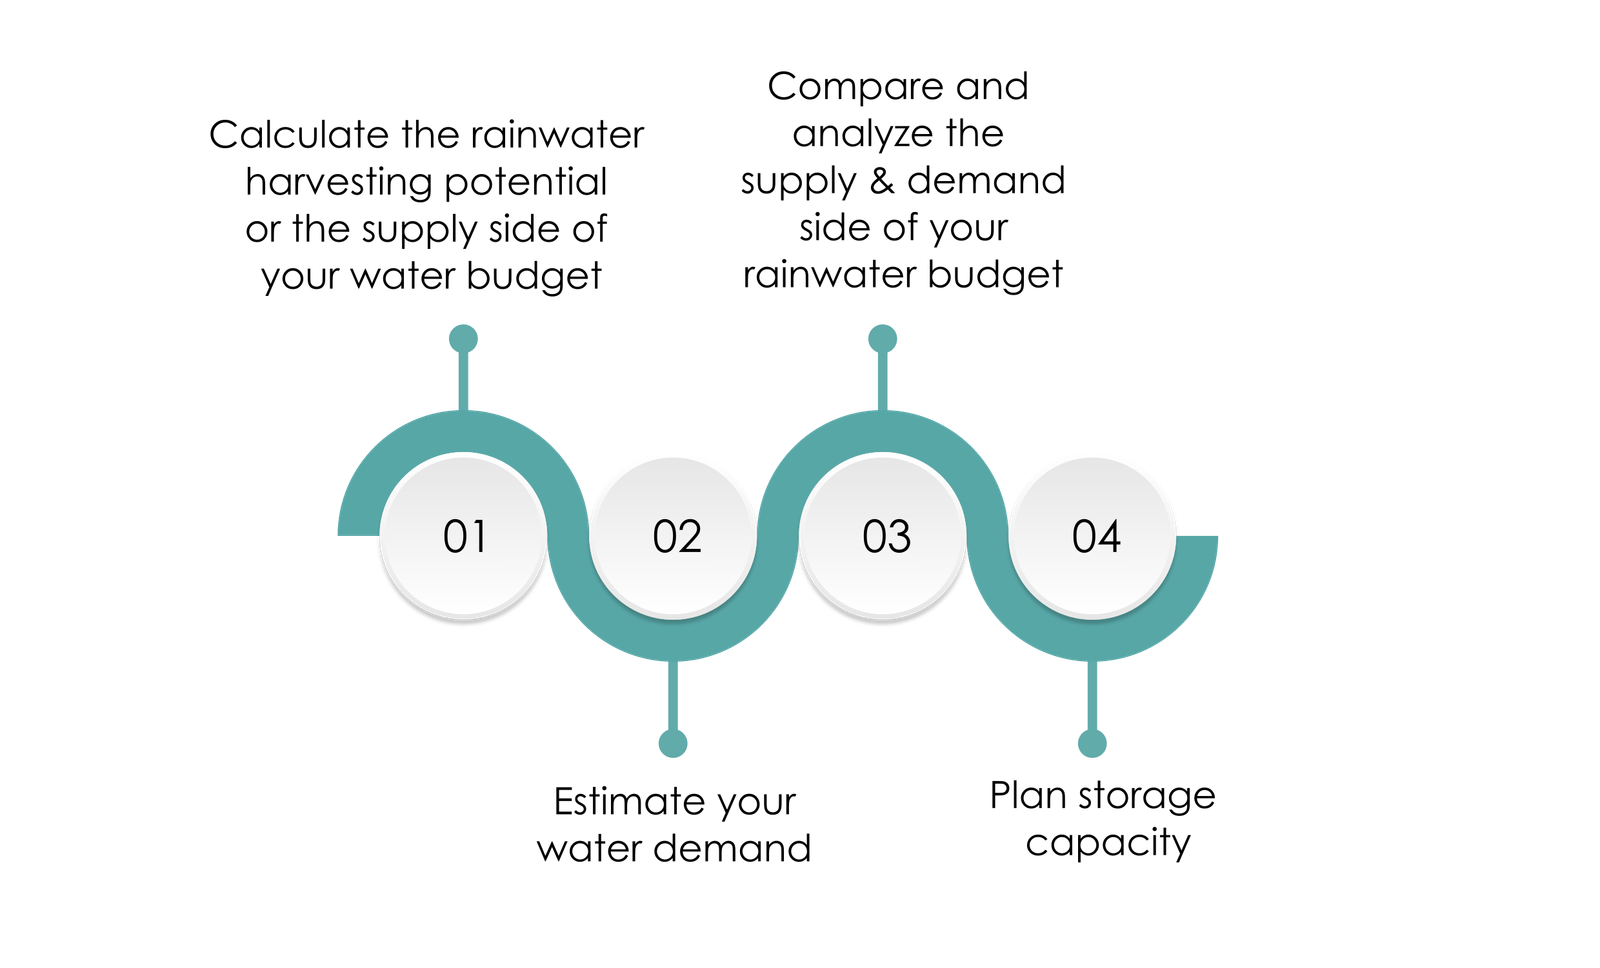
Assessing Your Needs
Before you start setting up your rainwater harvesting system, it’s crucial to understand your water needs. This assessment will ensure you capture enough water for your household or intended use. Here, I’ll guide you through calculating water requirements, ensuring you make the most out of your rainwater harvesting.
Calculating Water Requirements
Understanding the amount of rainwater you need begins with knowing your household usage. Here’s how you can determine your water needs:
- Estimate Daily Usage: Begin by assessing your daily water consumption. Common household uses include:
- Bathing
- Cooking
- Washing clothes
- Cleaning
- Gardening
You might find it useful to check your water bill to see historic usage.
Collect Rainfall Data: Look up how much rainfall your area typically receives. Websites like the Gardeners provide calculators to help estimate how much rain you can collect based on your roof area.
Calculate Collection Potential: To calculate how much rain you could collect, use this basic formula: [ \text{Rainwater collected} = \text{Roof Area (sqm)} \times \text{Rainfall (mm)} \times 0.85 ] The 0.85 is a factor accounting for water loss due to evaporation and inefficiencies. You can find more detailed calculators such as the one provided by the Energy Department.
Match Supply with Need: Determine if the collected water could sufficiently meet your needs throughout the year. Remember, different seasons may result in varying water availability.
Here’s a simple way to visualise your needs:
- Monthly Needs: Multiply your daily requirement by 30 to get a rough estimate of monthly needs.
- Rainfall Volume: Using the local rainfall data, calculate the potential volume you can collect each month (Raingutterpros has an excellent guide on this).
Example: If your household uses approximately 500 litres daily, your monthly need is about 15,000 litres. By checking local rainfall averages and roof size, you can see if setting up a rainwater harvesting system will meet this demand.
Assessing these needs might seem time-consuming, but it’s an essential step. Knowing your exact requirements ensures that your rainwater harvesting system is adequately designed to support your household all year round. Rainwater harvesting not only saves water but also contributes to a more sustainable living practice. Every drop you capture reduces your dependency on mains water, thereby conserving this precious resource.
Choosing the Right Components
Setting up a rainwater harvesting system involves choosing the right parts to meet your needs. It’s not just about catching water; it’s about making sure you have clean, usable water at the end of the line. I’ll walk you through some of the key components you need to consider.
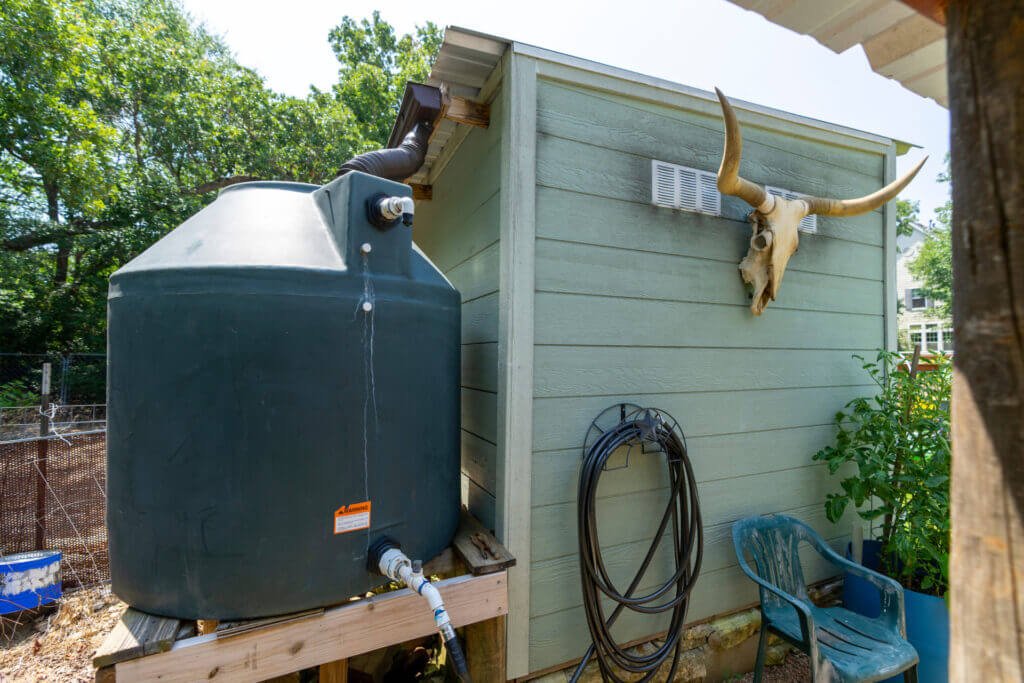
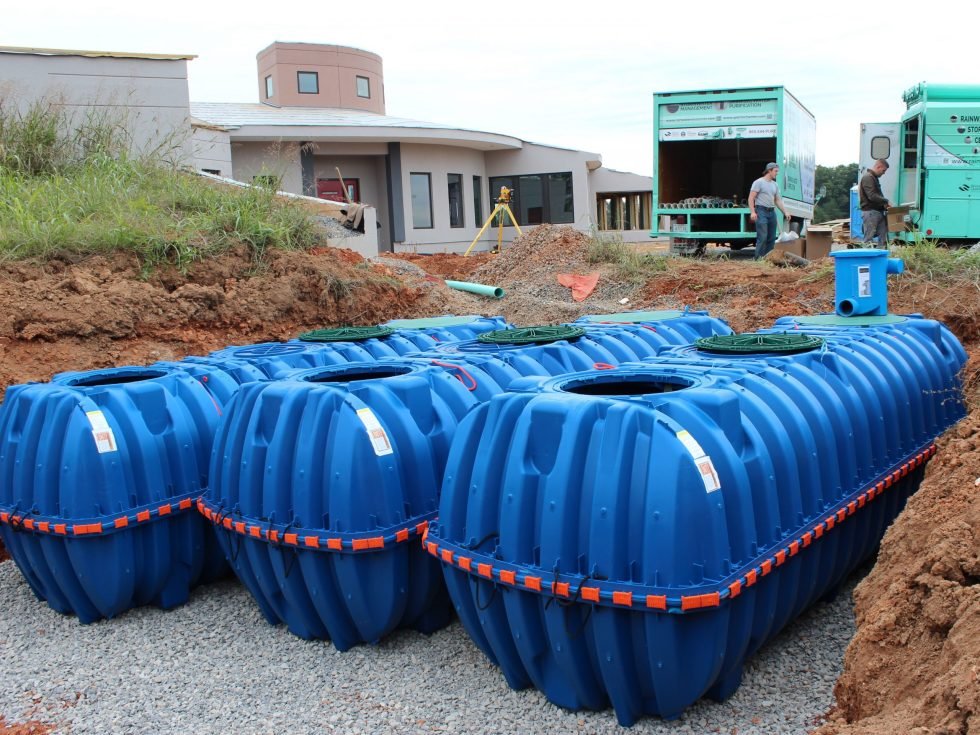
Selecting Storage Tanks
Choosing the right storage tank is crucial. Here are some ways to make sure you get the right one:
Size: Storage tanks come in all shapes and sizes. Your choice should be based on your water needs and the amount of rainfall your area receives. For small gardens, a modest-sized tank might suffice, but for larger properties, you’ll need a bigger tank.
Material: Tanks are often made from plastic, metal, or concrete. Plastic tanks are light and easy to install, while metal tanks are durable, and concrete tanks are highly robust and can keep the water cool.
Placement:
- Above ground: It’s easier and cheaper to install but could take up unnecessary space.
- Below ground: Saves space but can be a bit more expensive and tricky to set up.
- Underground tanks are usually preferred for properties with large lawns or gardens because they do not interfere with the landscape.
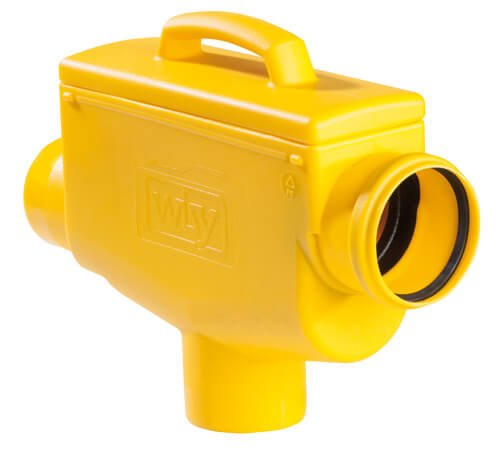
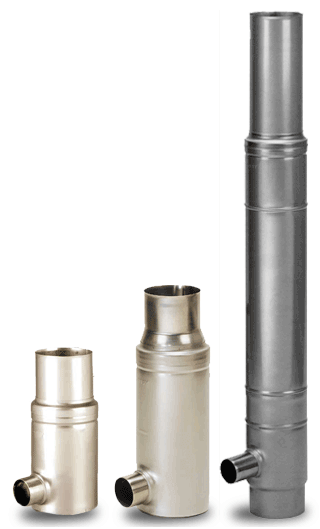
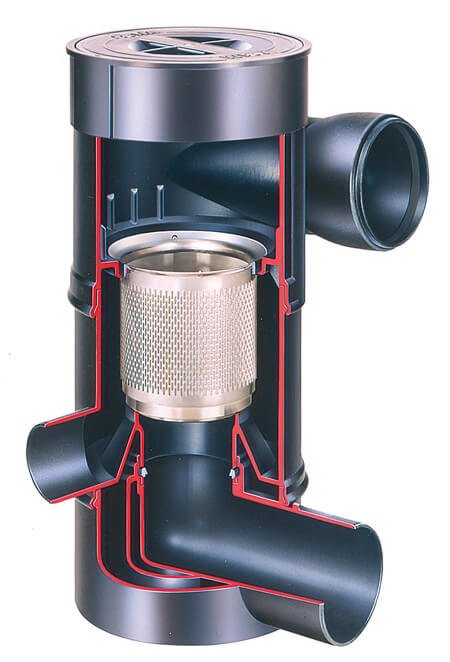
Incorporating Filters and Pumps
Filters and pumps play a vital role in ensuring your water are usable.
Filters:
- Pre-filters: These remove large debris like leaves and twigs before the water enters the tank.
- Fine filters: Installed at the tank’s inlet and often inside the pump, these prevent smaller particles from contaminating the water supply.
Pumps:
- There are direct-pumped systems where the pump is inside the tank and direct-pumped systems with the pump inside your home. Each has its cost and suitability.
- It’s often recommended to use a control unit that includes both the pump and the mains water back-up to save space and streamline the installation process.
A good example from this guidance The Core Components Of A Rainwater Harvesting System, directs users to assess their space for selecting such control units accurately.
Having robust filters and pumps in place ensures high water quality, allowing you to make the most out of your rainwater harvesting system.
If you are eager to dive deeper into the components, this rainwater system components breakdown is a compelling read.
Selecting the right components of your rainwater system ensures that the water you harvest is safe, reducing your dependency on mains water and promoting sustainability. And don’t forget, proper installation is key to maximising efficiency and longevity of the system. Optimize your choices to reap the full benefits of rainwater harvesting.

Installation Steps
Installing a rainwater harvesting system might seem like a daunting task, but with the right steps, you can turn the process into a worthwhile project. Here’s how to get started:
Site Preparation
Before diving into the installation, it’s essential to prepare the site properly. This ensures that your rainwater harvesting system functions effectively and safely.
Check Local Regulations: First, make sure to check with local authorities regarding permits or regulations for rainwater harvesting.
Choose a Suitable Location: Pick a location that ensures proper drainage. Avoid places where water tends to pool since this could lead to flooding risks.
Ground Preparation: The site should be levelled to ensure the water tank is stable. Remove any debris or large rocks that could damage the tank.
Install Drainage: Ensure good drainage around the tank. If the area is prone to flooding, install a French drain or use gravel to improve water runoff.
You may find more details on site preparation here.
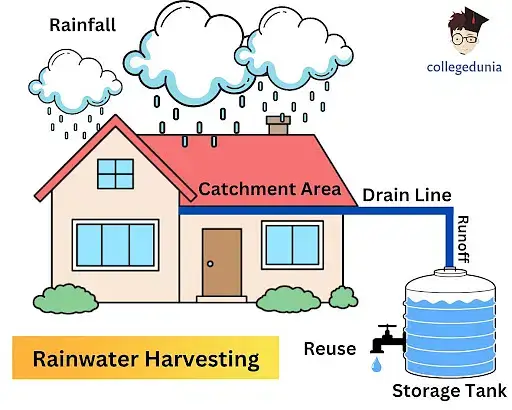
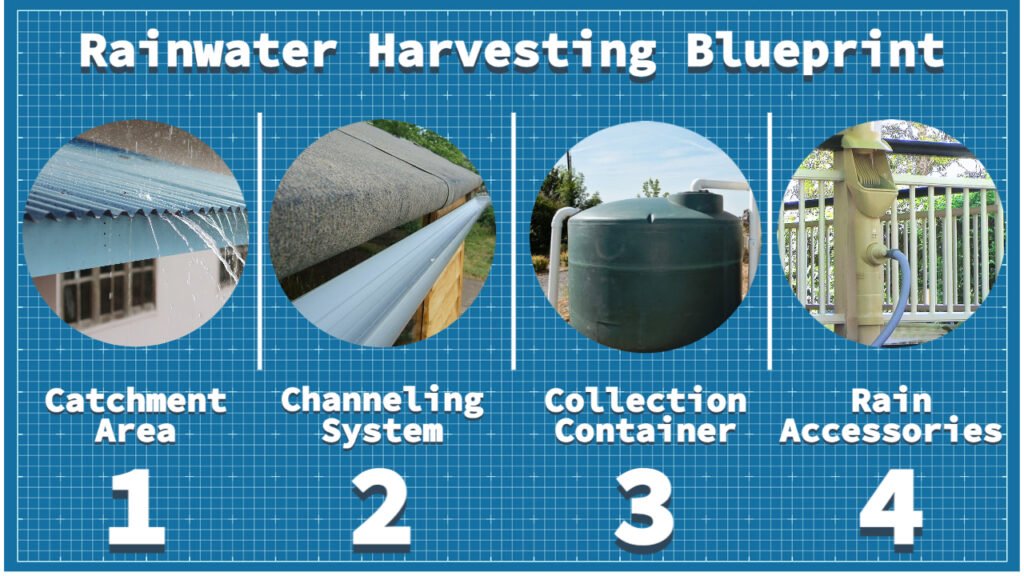
Setting Up the Collection System
A crucial part of rainwater harvesting is the collection system. This involves installing gutters, downspouts, and the collection tank.
Install Gutters:
- Ensure gutters are clean and free from debris.
- Install screens to keep out large debris.
- Secure gutters to the roof with brackets every 3 feet to ensure they don’t sag.
Attach Downspouts:
- Connect the gutters to downspouts at the corners of your house.
- Use screws or rivets to secure the downspout to the gutter.
Setting Up the First Flush Diverter:
- Install a first flush diverter before connecting the downpipe to the water tank. This helps to divert the initial runoff which contains most contaminants.
Install the Collection Tank:
- Place your tank on the prepared platform. Elevating the tank slightly can help in creating water pressure.
- Connect the downpipe from the first flush diverter to the tank inlet.
Overflow Mechanism:
- Ensure the tank has an overflow mechanism to manage excess water. The overflow outlet should lead away from your home’s foundation.
For more tips on installation details, you can look here..

Final Thoughts
After installing the collection system, double-check all connections to ensure there are no leaks. Proper site and collection system setup will make way for efficient rainwater harvesting, ensuring that you make the most of the natural rainfall.
Stay tuned for more sections in this guide where we’ll explore further steps and maintenance tips for your rainwater harvesting system!
Maintenance of Your Rainwater Harvesting System
Just like any system, a rainwater harvesting setup requires regular maintenance to ensure it functions correctly and efficiently. Consistent cleaning, inspections, and timely repairs are crucial to keep everything in top shape and maximise the system’s longevity
Regular Cleaning and Inspections
Maintaining your rainwater harvesting system involves consistent monitoring and cleaning. Here’s a handy checklist to keep things running smoothly:
Filters
- Check for Debris: Inspect filters regularly for leaves, twigs, and other debris that can block the system.
- Clean It Up: Clean the filters every 2-3 months to ensure optimal water flow and quality. Using a hose can be helpful to flush out the debris.
- Replace Worn Out Parts: Ensure that any filter materials that show signs of wear and tear are replaced promptly.
Regularly cleaning your filters helps to maintain the quality of water, making it safer for non-potable uses. More detailed information on how filters work can be found here.
Tanks
- Inspect for Cracks or Leaks: Look for any signs of wear, cracks, or leaks in your storage tanks. A cracked tank can waste harvested water and reduce efficiency.
- Check for Sediment Buildup: Sediments collect at the bottom of the tank over time. It’s best to clean the tanks annually to avoid any blockages or contamination.
- Ensure Proper Seals: Make sure that lids and entry points are properly sealed to prevent dirt and pests from entering the water supply.
Explore more tips about tank maintenance here.
Gutters
- Clear Debris: Regularly clear leaves, sticks, and other debris from gutters. Blocked gutters can lead to overflow and reduced efficiency.
- Inspect Gutter Angles: Ensure your gutters are angled correctly to direct rainwater efficiently to the tank. Incorrect angles can lead to water wastage.
- Check for Rust or Damage: Inspect gutters for rust, holes, or other damage which might affect the water flow or contaminate the water.
For best practices on keeping gutters clear, visit this informative guide.
Regular cleaning and inspections are like giving your rainwater harvesting system a health check-up. Ensuring these parts are in good condition helps you harvest the highest quality of water safely and efficiently.

Conclusion
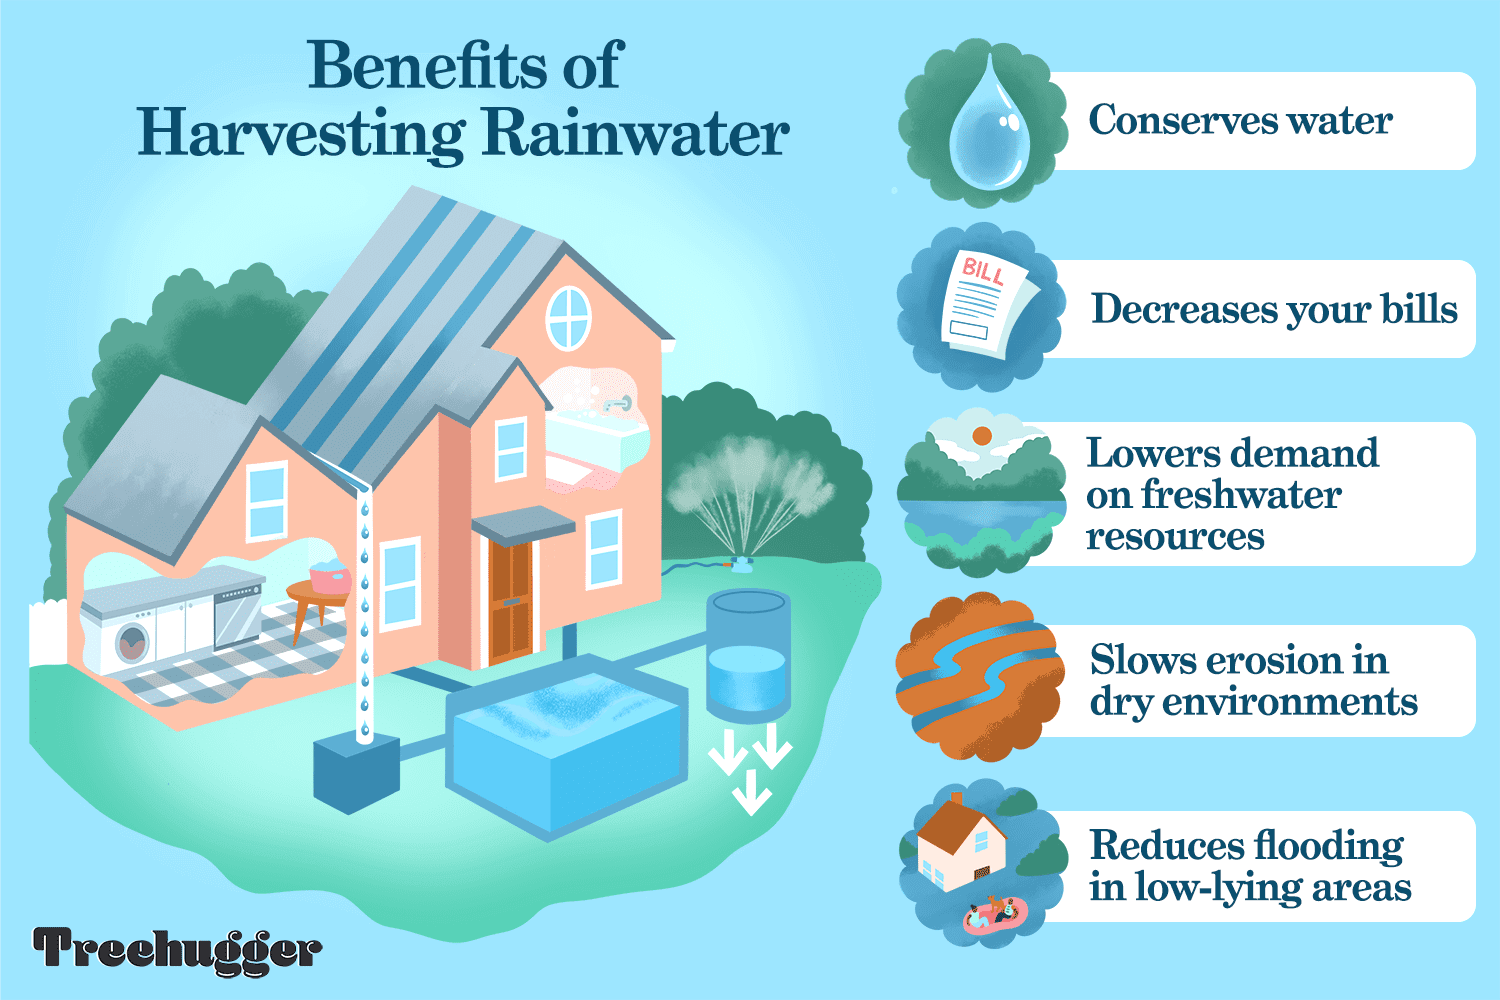
In a world where sustainability is key, setting up a rainwater harvesting system offers numerous benefits. It’s not just about conservation; it’s about creating a self-sufficient, eco-friendly home that supports your prepper lifestyle. Let’s summarise some of the main benefits and encourage you to consider rainwater harvesting.
Environmental Benefits
Harvesting rainwater can significantly reduce your environmental footprint. By collecting and using rainwater, you reduce the strain on municipal water sources. Additionally, according to Blue Barrel Systems, rainwater harvesting helps reduce stormwater runoff, which can lead to less flooding and lower levels of water pollution.
Cost Savings
One of the more immediate benefits you’ll notice is the reduction in your monthly water bill. While the initial setup might have a cost, the long-term savings are substantial. As Premier Tech Aqua mentions, less reliance on the grid means fewer expenses over time and greater independence.
Emergency Preparedness
As preppers, having an alternative water source during emergencies is invaluable. Whether it’s a natural disaster or a local water supply issue, a well-established rainwater harvesting system ensures you always have water on hand. This backup system can be a lifeline in times of crisis.
Healthier Plants and Soil
Gardeners often find that rainwater is better for plants. Tap water can contain chemicals such as chlorine and fluoride that aren’t always beneficial to plant health. Rainwater, on the other hand, is soft and naturally free of added chemicals, promoting healthier plant growth. This point is echoed by the Water Cache, noting that collected rainwater is perfect for gardening.
Supporting Sustainability Goals
Adopting rainwater harvesting is an excellent step towards achieving your sustainability goals. By tapping into this resource, you make a conscious choice to reduce your reliance on limited natural water sources, fostering a more sustainable lifestyle.
Incorporating a rainwater harvesting system into your home isn’t just about the practical benefits, like saving on water bills or having an emergency backup. It’s a small yet powerful gesture towards a more sustainable and self-sufficient life. By choosing to harvest rainwater, you are taking a significant step in protecting the environment and ensuring that your prepper community is resilient and ready for whatever comes its way.
Take a look at our Water Purifier/Filter’s below