Post Contents
ToggleThe Importance of a Prepper Pantry
In today’s unpredictable world, having a prepper pantry has become more important than ever. This isn’t just for hardcore survivalists; it’s a practical way to ensure your family has enough food and essentials during emergencies. A prepper pantry means being self-sufficient and ready for whatever might come your way.
A Prepper Pantry Explained
A prepper pantry is simply a storage space stocked with food and other supplies that can last for extended periods. This isn’t your everyday pantry filled with weekly groceries. Instead, it’s a well-thought-out collection designed to help you survive in an emergency.
You can use this pantry in several ways, including as a backup when you can’t get to a grocery store. During situations like natural disasters or even economic downturns, having your own stocked pantry can be a lifesaver. According to Mary’s Nest, everyone should consider having one.
The Role in Emergency Situations
Imagine a power outage or severe weather condition that leaves you homebound. A prepper pantry provides you with the essentials you need without the panic of an empty fridge. Here’s why it’s beneficial:
- Accessibility: When stores are closed or shelves are empty, your home is stocked.
- Nutrition: Maintain a balanced diet because your prepper pantry is built with nutrition in mind.
- Peace of Mind: Knowing you have everything necessary reduces stress during emergencies.
Self-Sufficiency and Peace of Mind
Building and maintaining a prepper pantry isn’t about paranoia; it’s about self-sufficiency. With the right supplies, you can ensure that your family’s needs are met, even when routine resources are unavailable. This sense of readiness and independence is invaluable.
This kind of preparation involves more than just canned beans and rice. Including diverse items like preserved meats, long-life milk, and dry goods can make your pantry robust. By planning carefully and rotating your stock, you can enjoy everyday conveniences while being prepared for emergencies.
Remember, a well-stocked prepper pantry is an investment in your family’s safety and well-being. Keep reading where I’ll share tips on how to stock and organise your own prepper pantry, making the process straightforward and manageable.
Essential Equipment for Canning and Preserving
When starting out with canning and preserving, having the right tools can make all the difference. Let’s look at some essential equipment that will help you fill your prepper pantry with homemade goodness.
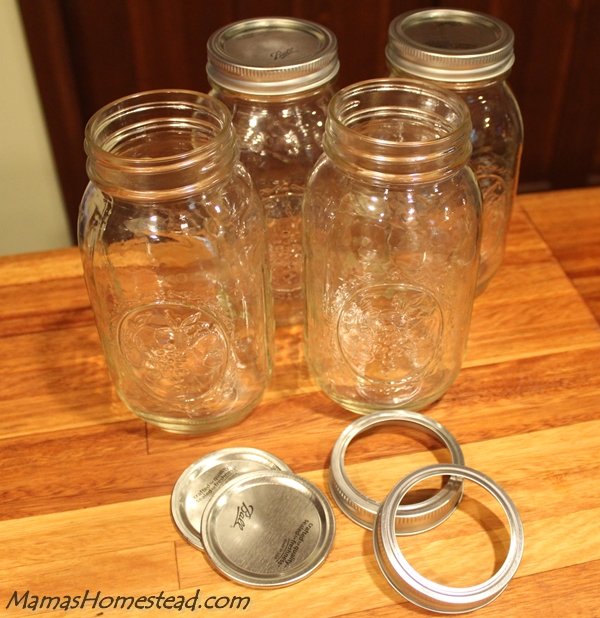
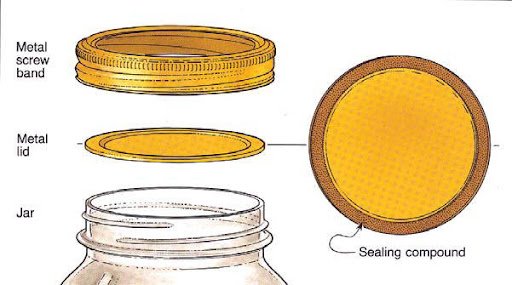
Mason Jars and Lids
Mason jars are the backbone of any canning operation. These sturdy glass containers come in various sizes, perfect for preserving anything from jams to pickles. The most popular sizes are pint and quart jars.
- Mason Jars: Get jars specifically designed for canning as they can withstand high temperatures.
- Lids and Bands: Each jar requires a lid and band. Lids create the vacuum seal, while bands hold the lids in place during the process.
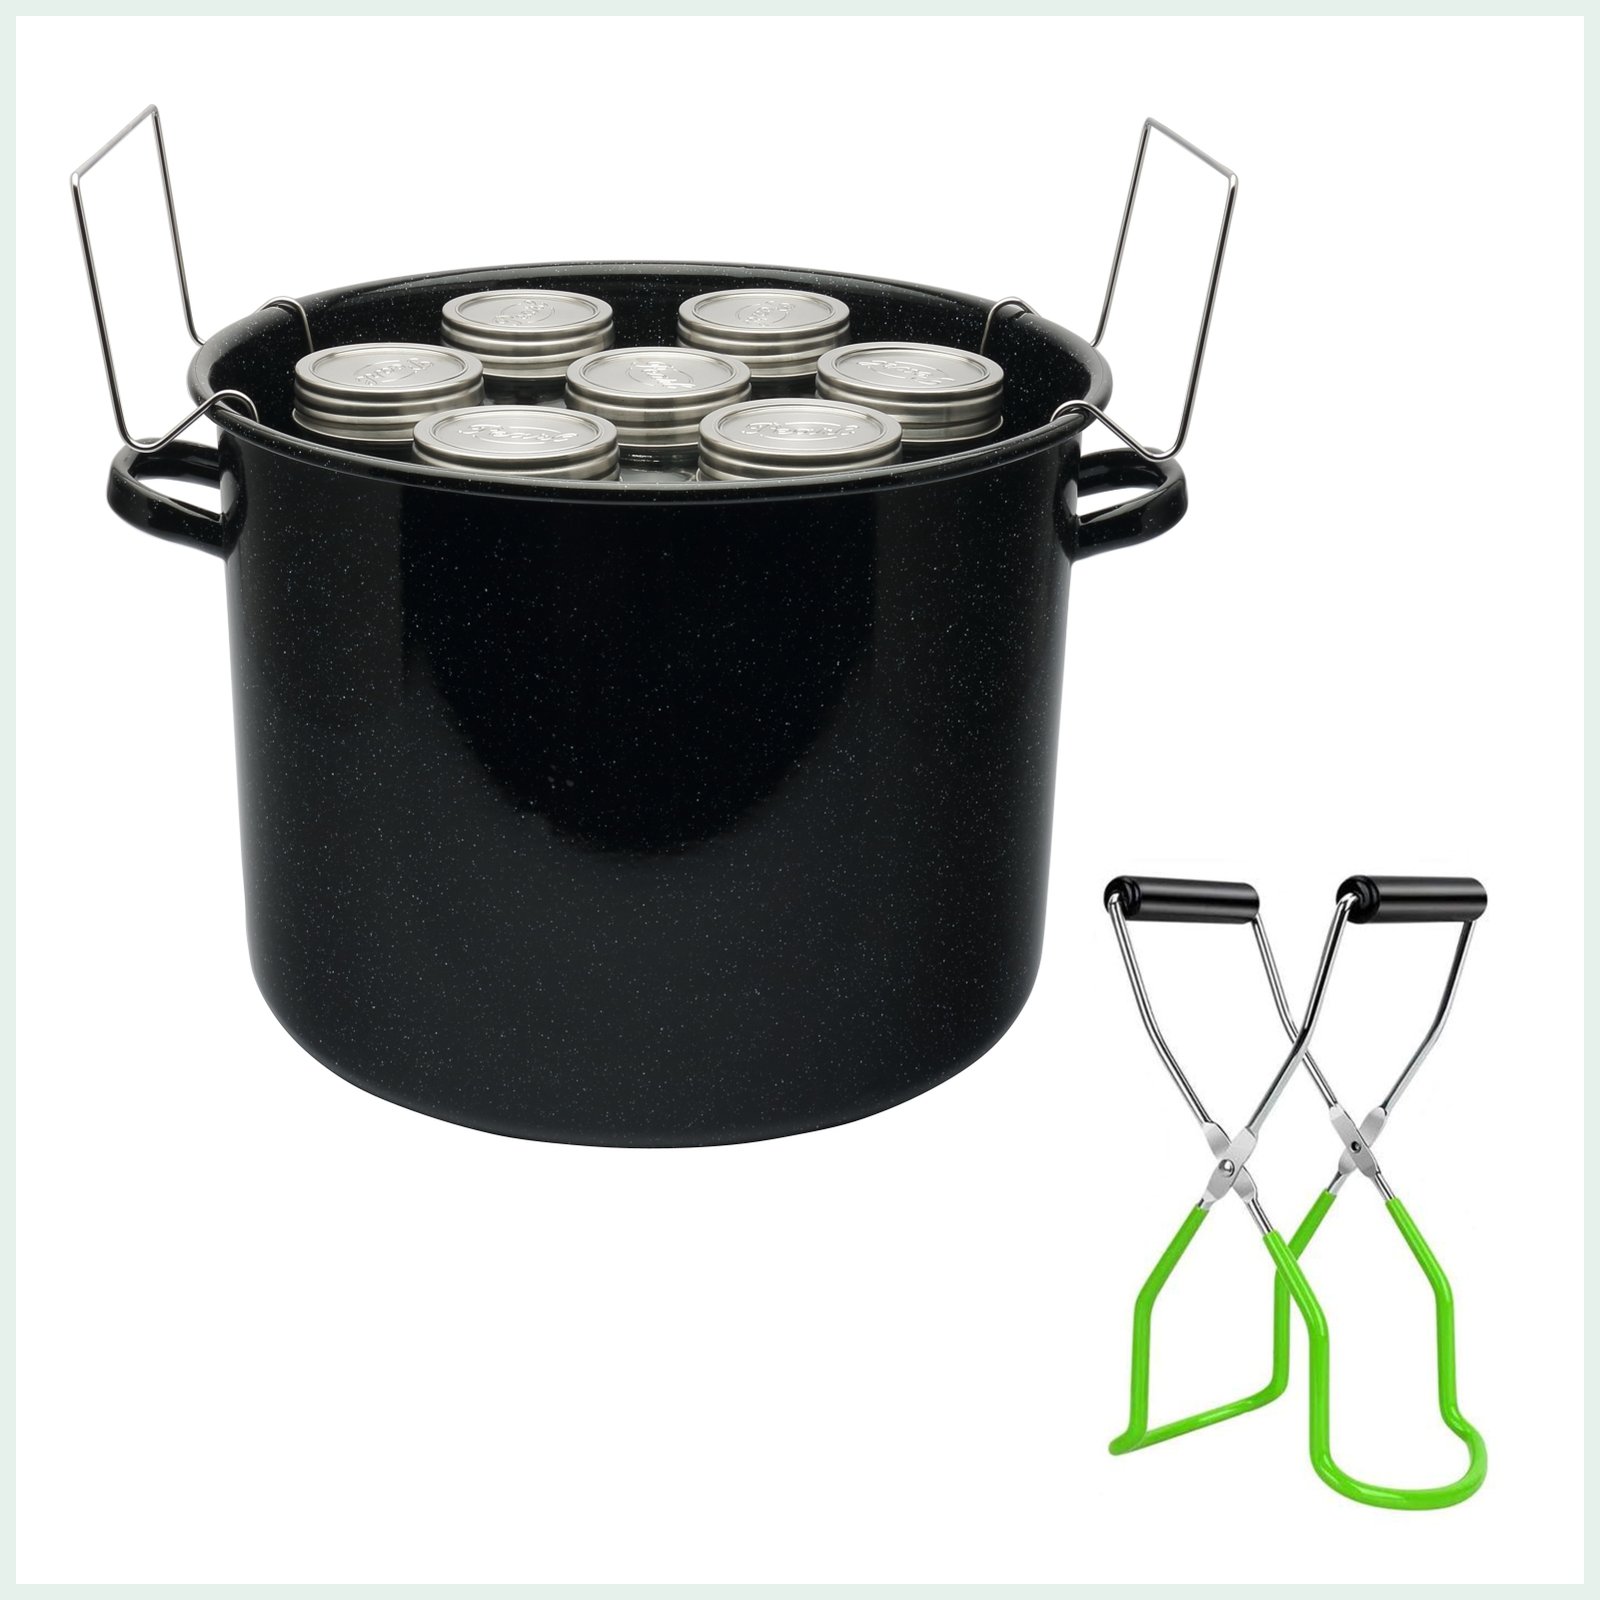
Water Bath Canner
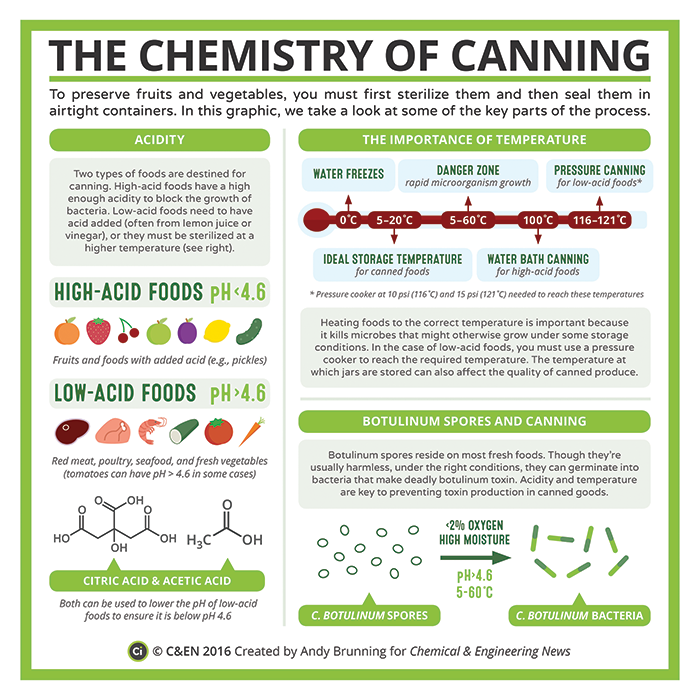
A water bath canner is essential for canning high-acid foods like fruits, jams, and pickles. This large pot allows jars to be completely submerged in boiling water.
- Pot Size: Make sure your pot is deep enough to cover the jars with at least an inch of water.
- Canning Rack: A rack keeps the jars from sitting directly on the bottom of the pot, ensuring even heat distribution.
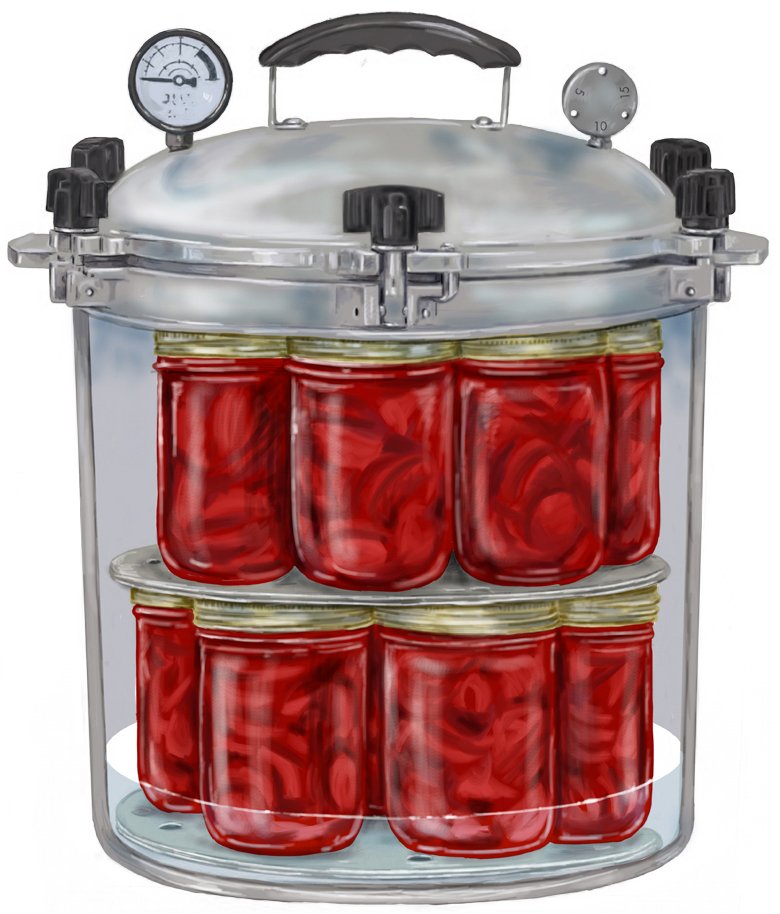
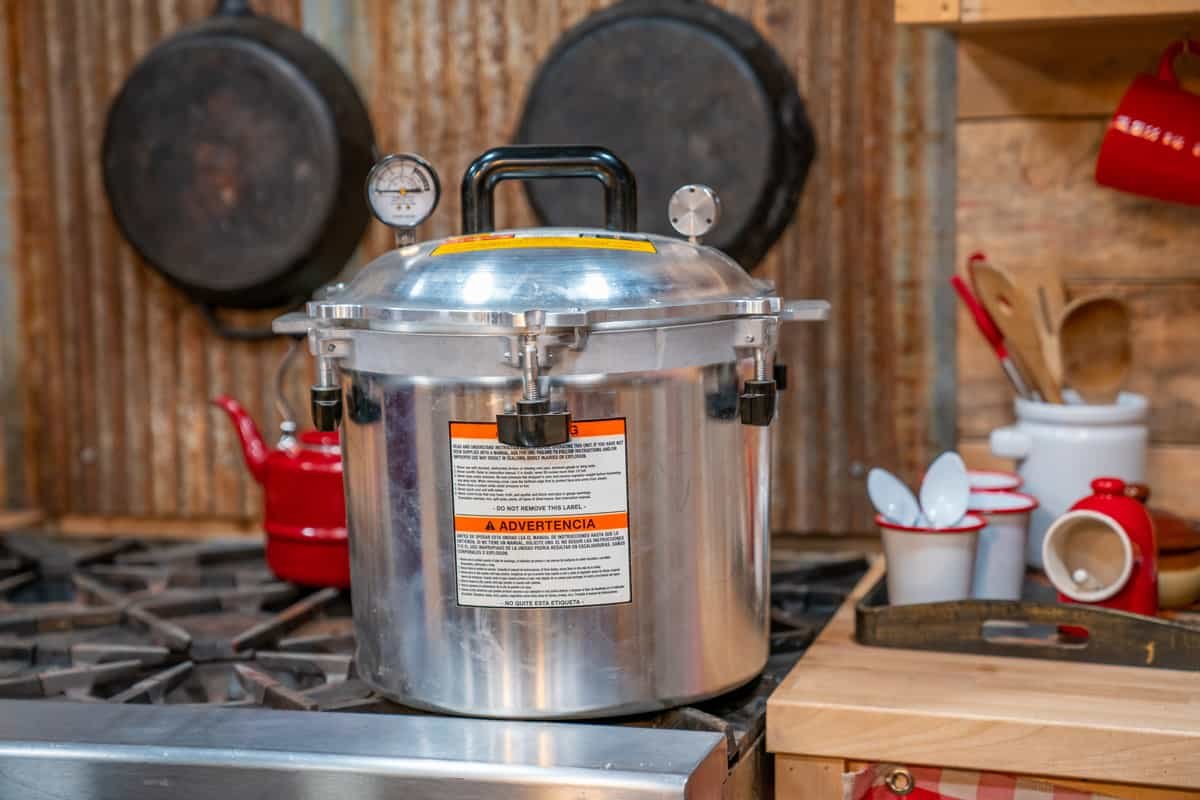
Pressure Canner
When it comes to canning low-acid foods like vegetables, meats, and soups, a pressure canner is a must. Unlike a regular pressure cooker, a pressure canner reaches the high temperatures necessary to safely preserve low-acid foods.
Check out these tips for using a pressure canner safely and effectively.
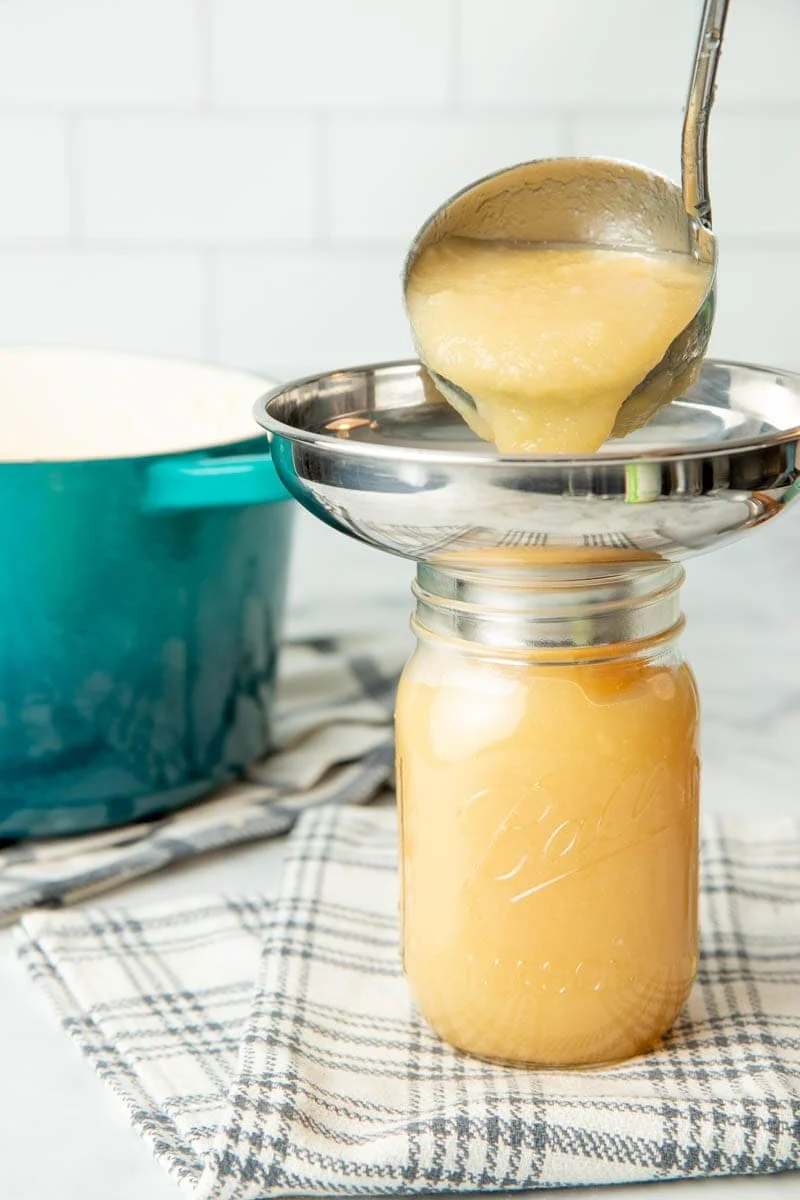
Funnel and Ladle
To fill your jars without making a mess, you’ll need a funnel and a ladle.
- Wide-Mouth Funnel: Fits neatly into the jar opening, making it easy to transfer your prepared foods.
- Ladle: A ladle with a spout makes it even simpler to pour liquids into the jar without spilling.
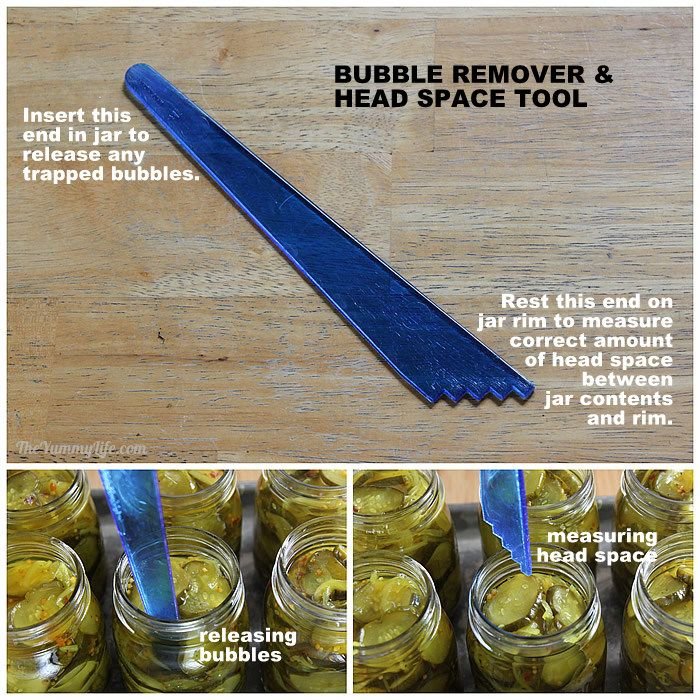
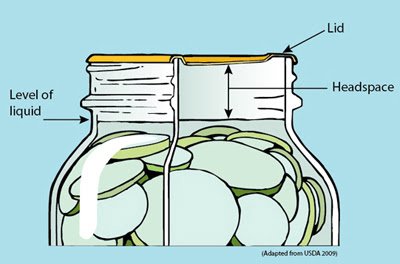
Headspace Tool
Maintaining the right headspace in your jars is vital for a proper seal. A headspace tool helps you measure the space between the top of your food and the lid – too much or too little can affect the seal and the safety of your preserved goods.
Bubble Remover
Eliminating air bubbles before sealing jars increases the quality and safety of your preserves. A bubble remover (often part of the headspace tool) allows you to release trapped air bubbles efficiently.

Clean Cloths and Dish Towels
Having plenty of clean cloths and dish towels on hand is essential. You’ll need them for wiping jar rims, cleaning spills, and handling hot jars. Investing in good quality, lint-free cloths is worthwhile.
With these essential items, you’ll be well on your way to successfully canning and preserving food. Each tool plays a critical role in ensuring that your preserves are safe, tasty, and shelf-stable. Stay tuned for the next section, where we’ll dive into the process of canning step-by-step!
Take a Look at Our Canning and Preservation Kit Below
Understanding Different Canning Methods
Canning food at home involves various methods to preserve your harvest effectively. If you’re looking to stock your prepper pantry with homemade goods, understanding these methods is key. We’ll focus on two main canning techniques: water bath canning and pressure canning.
Water Bath Canning
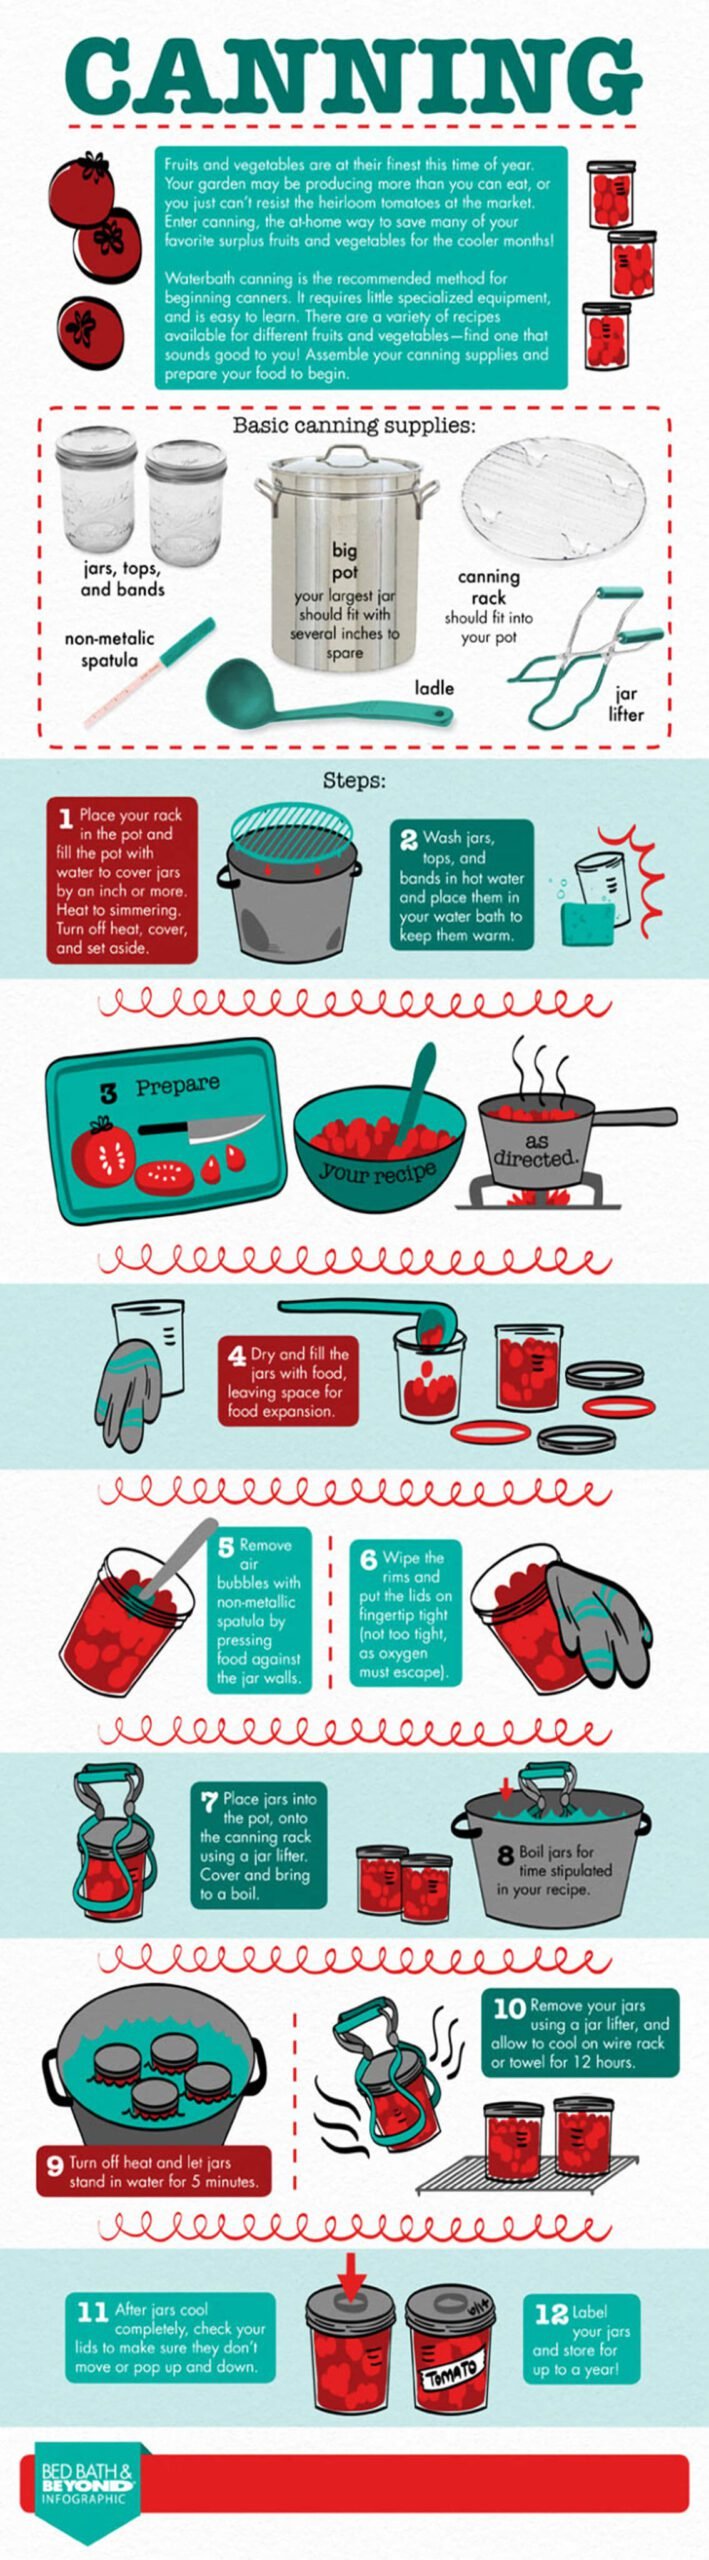
Water bath canning is a popular method for preserving high-acid foods such as fruits, jams, jellies, and pickles. It’s a straightforward process that involves submerging jars in boiling water. Here’s how to do it:
- Gather Your Supplies: You’ll need mason jars, lids, bands, a water bath canner (a large pot works too), and a rack for the pot.
- Prepare Your Jars and Lids: Wash and sterilise the jars and lids in hot, soapy water.
- Fill the Jars: Using a ladle and funnel, fill the jars with your prepared food, leaving about 1/4 inch headspace.
- Remove Air Bubbles: Use a bubble remover to release trapped air by running it along the inside edges of the jar.
- Wipe the Rims: Clean the rims of the jars with a clean cloth to ensure a good seal.
- Apply the Lids and Bands: Place the lids on the jars and screw on the bands until they are fingertip tight.
- Process in Boiling Water: Place the jars on the rack in the boiling water canner. Ensure the jars are covered by at least an inch of water. Boil for the time required for your specific recipe.
- Cool and Store: After processing, remove the jars and let them cool undisturbed for 12-24 hours. Check the seals before storing.

Tips for Success:
- Always use trusted recipes to ensure safety.
- Keep the water boiling throughout the process.
- Never reuse canning lids.
For more detailed instructions and equipment needed, you can explore this extensive guide on water bath canning.
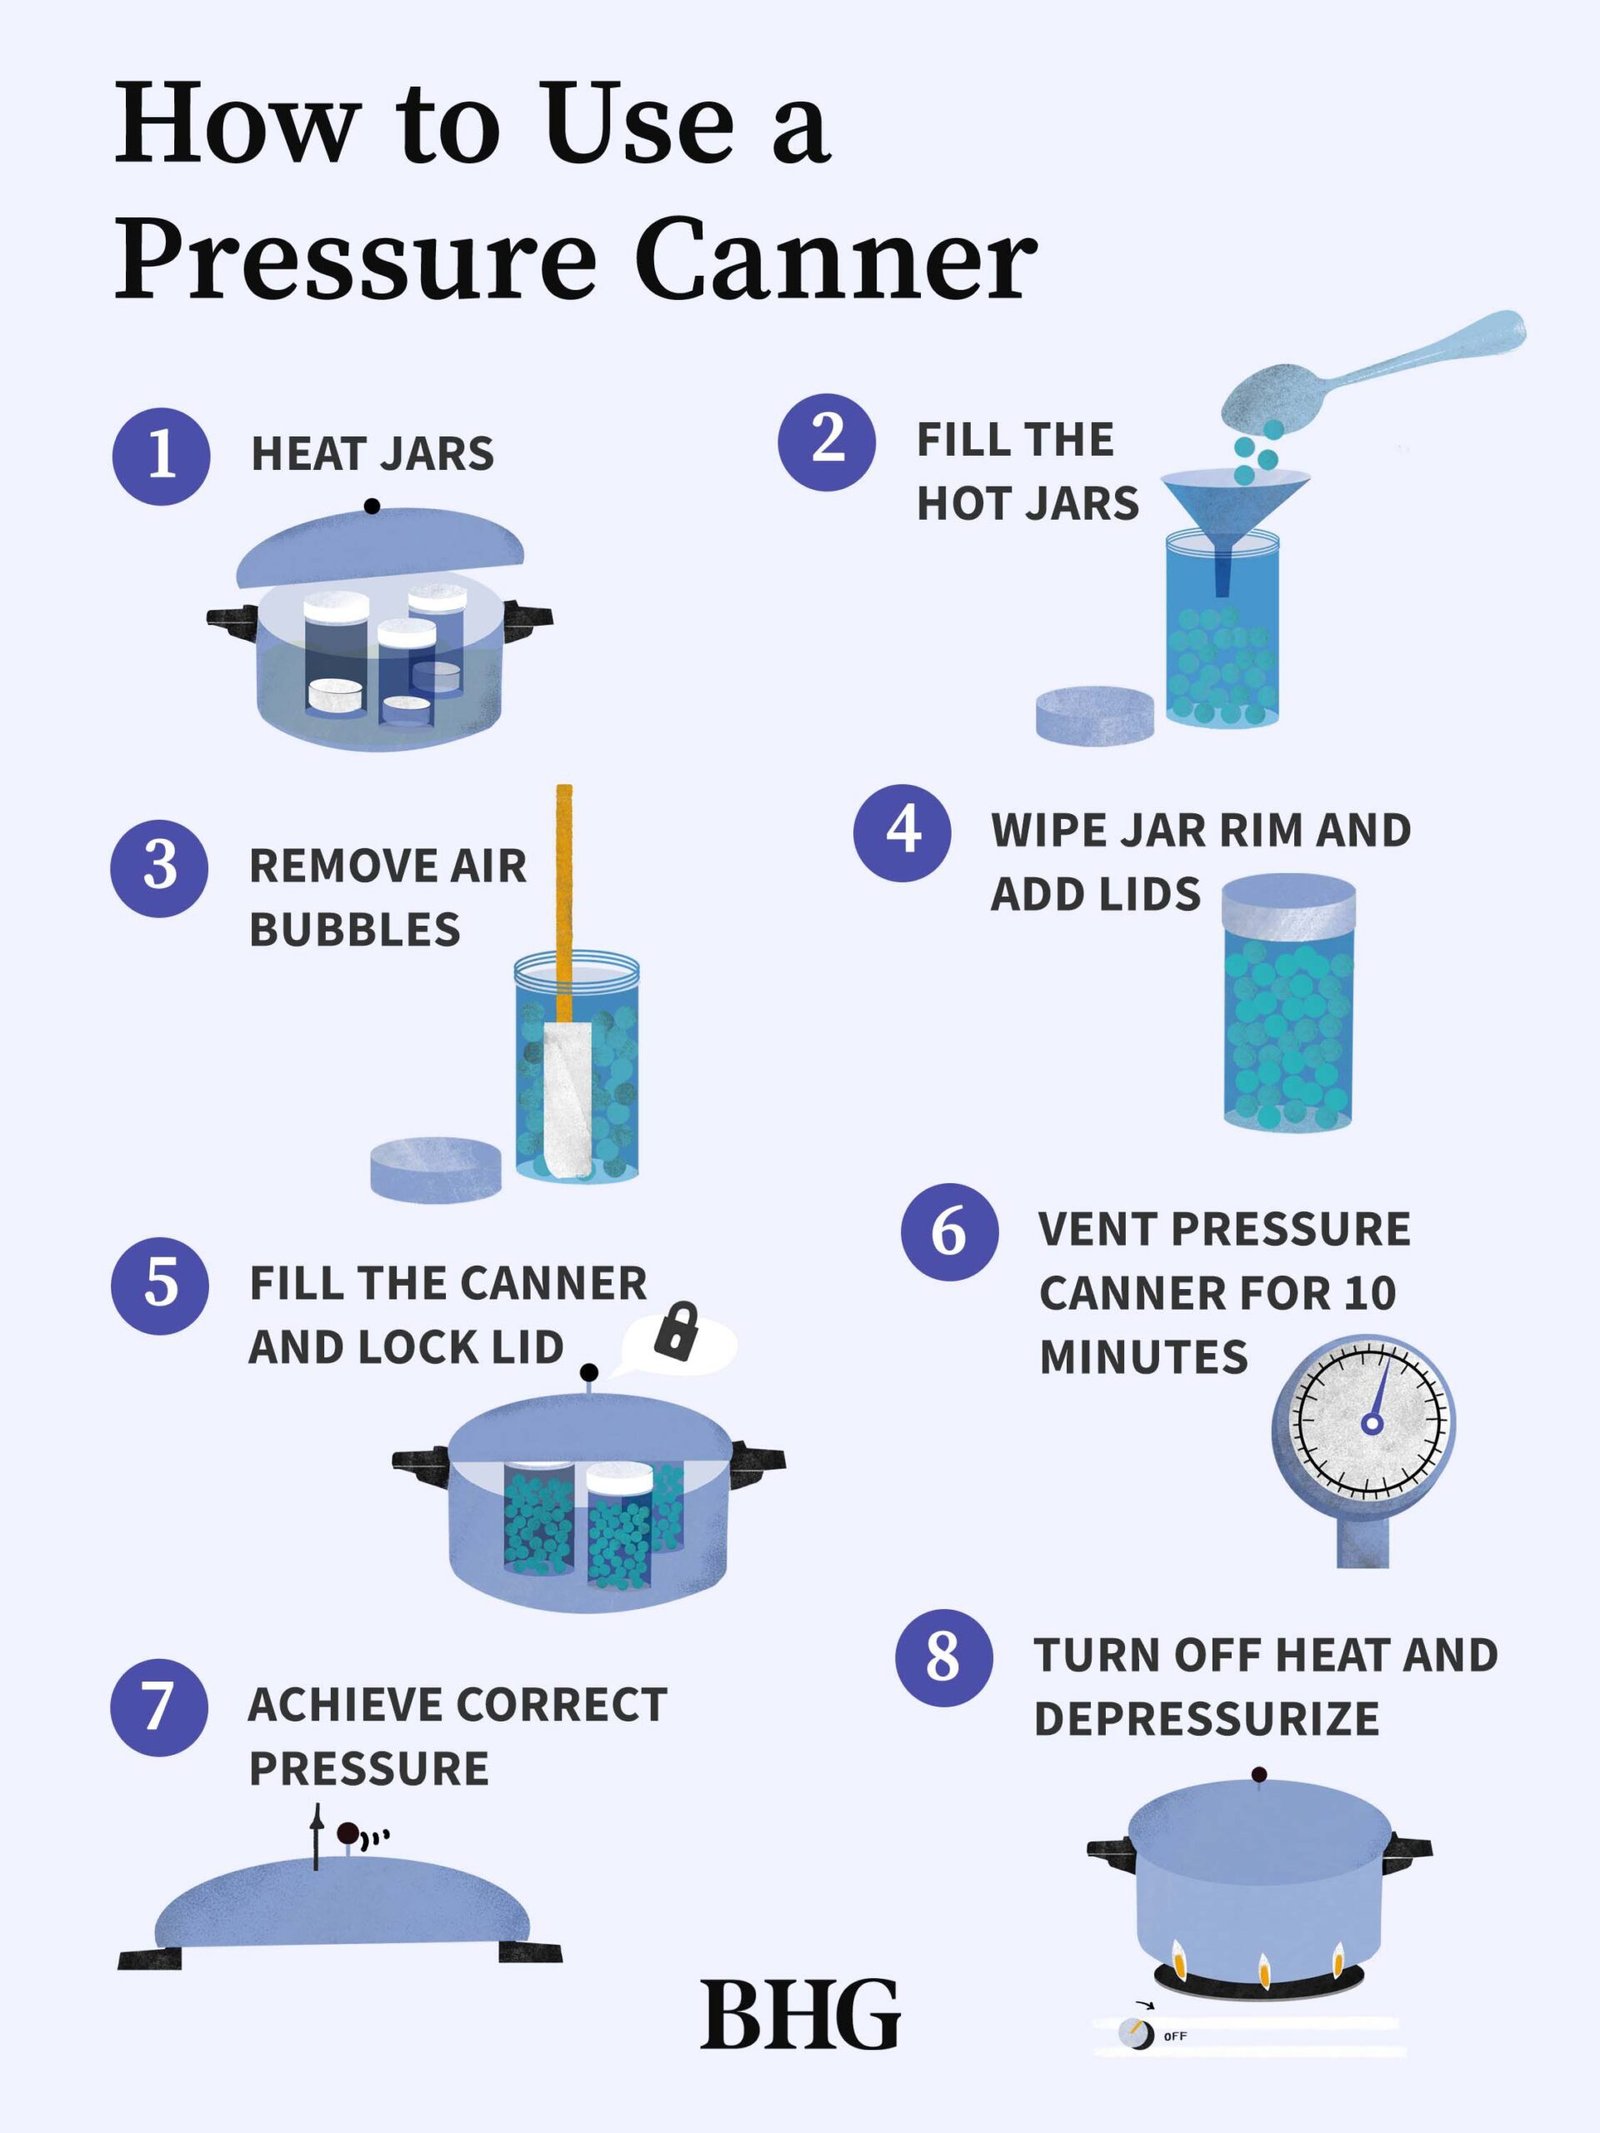

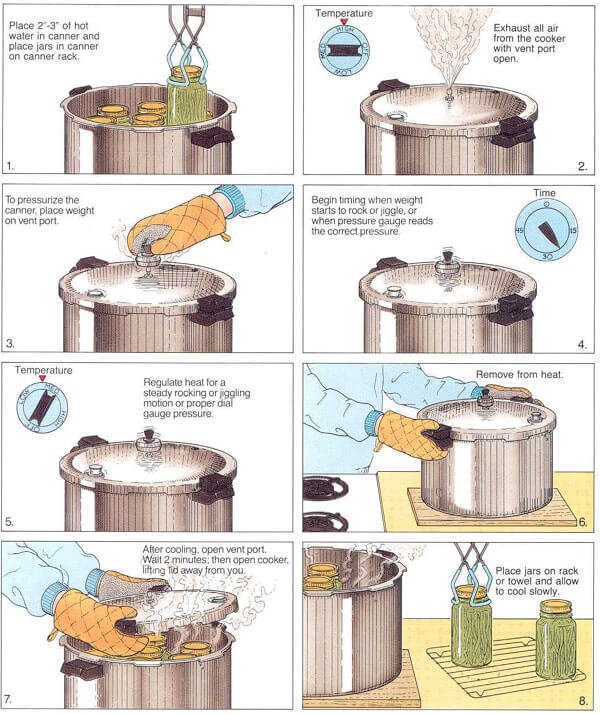
Pressure Canning
Pressure canning is used for preserving low-acid foods such as vegetables, meats, and soups. This method requires a special pressure canner to reach the necessary temperatures to safely process these foods. Here’s how you can do it:
- Gather Your Supplies: You will need a pressure canner, mason jars, lids, bands, and all the necessary food preparation tools.
- Prepare Your Jars and Lids: Similarly to water bath canning, wash and sterilise your jars and lids.
- Fill the Jars: Fill the jars with prepared food, leaving the correct headspace (usually about 1 inch). Remove air bubbles, wipe rims clean, and apply the lids and bands.
- Add Water to the Pressure Canner: Add about 2-3 inches of water to your pressure canner (follow the manufacturer’s instructions).
- Load the Canner: Place the jars in the canner using a jar lifter.
- Seal the Canner: Secure the lid on the canner and follow the manufacturer’s guidelines for sealing.
- Vent the Canner: Allow steam to vent for 10 minutes to get rid of trapped air.
- Process Under Pressure: Bring the canner to the required pressure and process for the time specified in your recipe.
- Cool Down: After processing, turn off the heat and let the canner cool down naturally. Do not rush this process as it can cause jars to break.
- Release the Pressure and Unseal: Once the pressure is fully released, open the canner, remove jars, and let them cool. Check seals before storing.
Safety Tips:
- Always follow the pressure canner’s instructions.
- Never substitute a regular pressure cooker for a pressure canner.
- Regularly check that your pressure canner is in good working condition.
Avoid common mistakes like using improper canning times or temperatures, which can lead to food spoilage. For more insights on the pressure canning process, visit the Penn State Extension’s guide.
Understanding these methods ensures you preserve your food safely and effectively, providing you with a trustworthy stock for your prepper pantry. Stay tuned for more tips and tricks on filling your pantry with delicious, home-preserved goods!
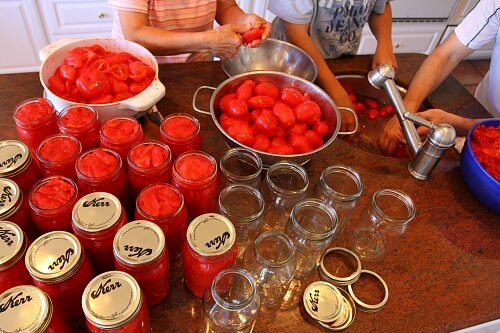
Preparing Your Food for Canning
Preparing your food correctly is essential for safe and successful canning. This step not only guarantees the longevity of your preserved items but also keeps the flavours intact. Let’s break down how to prepare different types of food for canning.
Selecting the Best Produce
You want your canned goods to be top-notch, so start by choosing high-quality ingredients. For fruits and vegetables, this means selecting ripe, but not overripe, produce. Anything bruised or damaged should be avoided.
- Fruits: Look for vibrant colours and firm textures. If you’re dealing with peaches or tomatoes, for example, a slight give when pressed is ideal.
- Vegetables: Choose crisp and fresh veggies. Wilted greens or vegetables with spots are a no-go.
- Meats: For meats, opt for fresh cuts. Avoid pre-seasoned or marinated meats as the added flavours can interfere with the canning process.
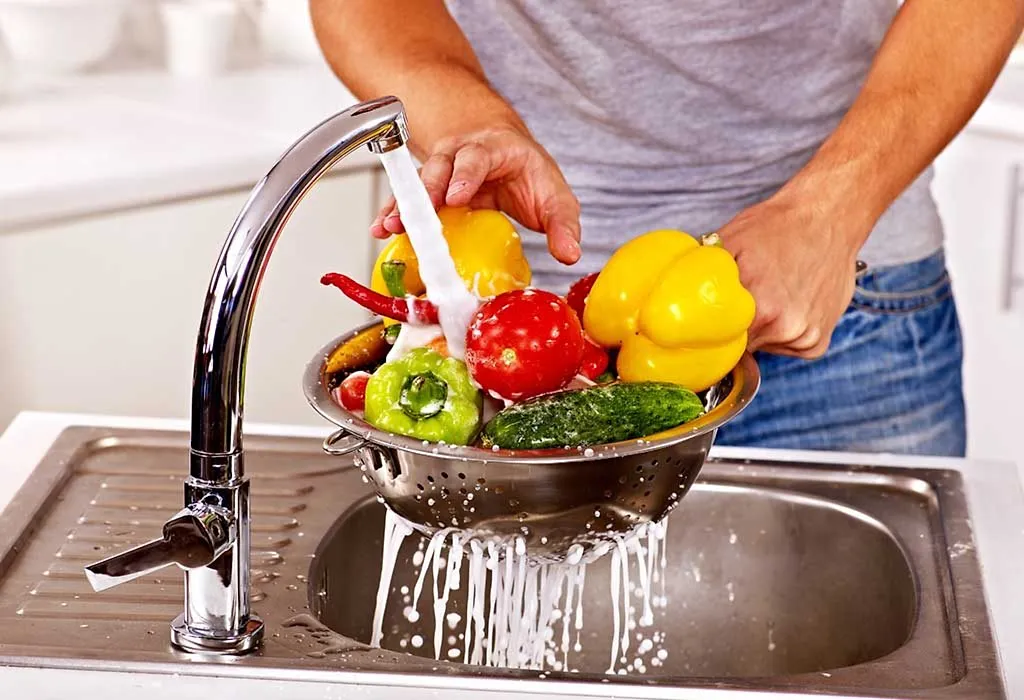
Washing and Cleaning
Before you dive into prepping, washing your food is crucial. For fruits and vegetables, this means a thorough rinse under cold water. It removes any dirt, bacteria, or pesticides.
- Fruits and Vegetables: Fill your sink with cold water and gently scrub the produce. A dedicated produce brush can help with more stubborn dirt.
- Meats: Rinse meats under cold water and pat them dry with a clean towel.
Learn more about safe techniques for washing produce.
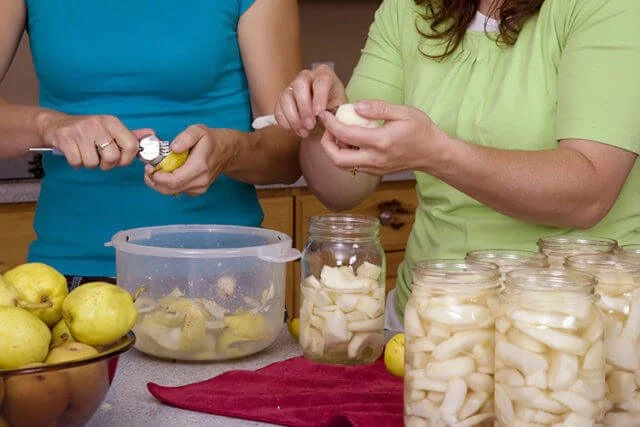
Peeling and Cutting
Once clean, some produce needs to be peeled and cut. This helps in packing your jars efficiently and ensures even cooking.
- Peeling: Some fruits like apples, pears, and peaches benefit from being peeled. Use a sharp knife or a vegetable peeler for this task.
- Cutting: Cutting your fruits and vegetables into uniform pieces ensures they fit neatly into jars and cook consistently. For example, cut carrots into thin rounds or sticks and fruits into slices or chunks as required.
Blanching
Vegetables, particularly, often need to be blanched before canning. Blanching involves boiling the vegetables briefly and then plunging them into cold water. It helps preserve colour, texture, and nutrients.
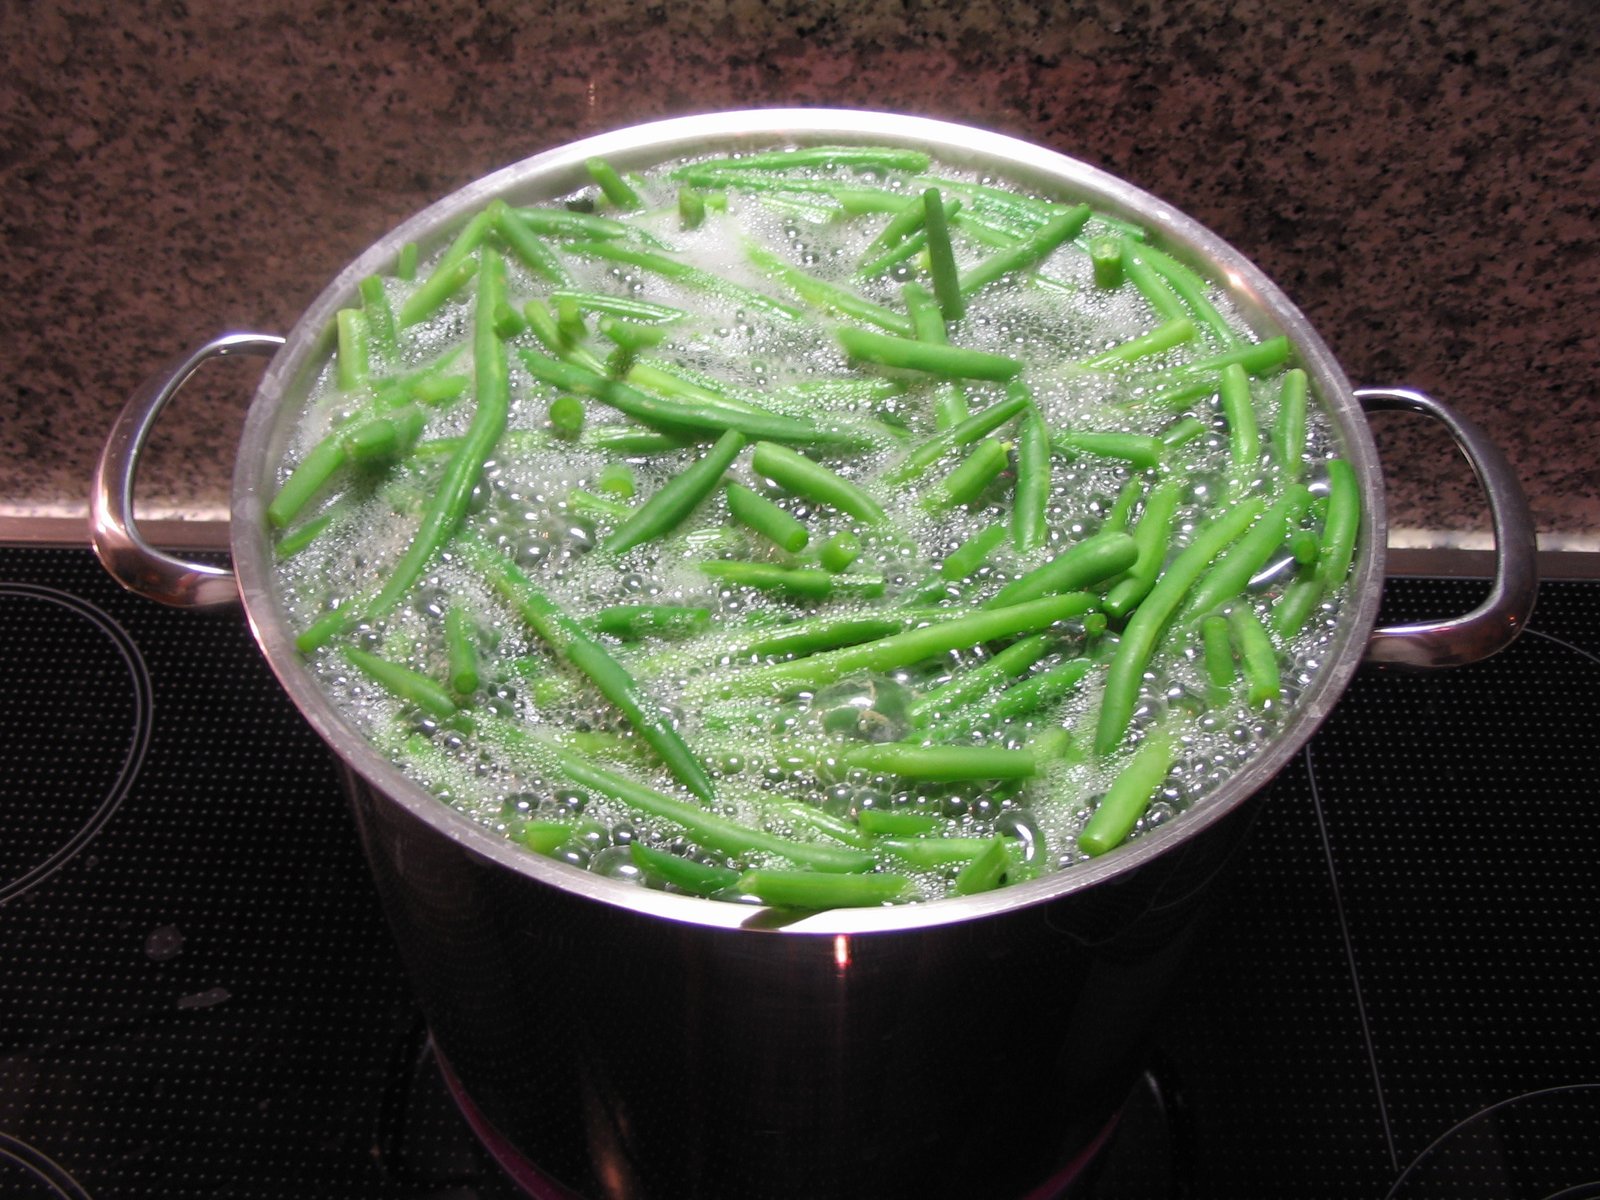
Steps for blanching:
- Boil: Bring a large pot of water to a rolling boil.
- Blanch: Add your vegetables in small batches, boiling for 2-5 minutes depending on the type (e.g., green beans need 3 minutes, while carrots require 4).
- Cool: Quickly transfer the veggies to a bowl of ice water to stop the cooking process.
Seasoning and Packing
When your food is prepped, think about seasoning. For meats or tomato-based sauces, add any desired herbs and spices at this stage.
- Seasoning: Use salt, sugar, and spices based on taste and the recipe. Avoid over-seasoning as flavours intensify over time.
- Packing: Pack foods tightly but avoid crushing. Leave the required headspace as mentioned in your recipe; usually, this is 1/2 inch for fruits and 1 inch for meats.
You’re almost ready to start the actual canning process, but this preparation step ensures everything runs smoothly. Properly prepped food means a safer and tastier end product, making your prepper pantry both nutritious and delicious.
Ready for the next step? Keep reading to learn about the different canning techniques and how to use them effectively!
For more information on home canning basics, check out this comprehensive guide by the USDA.
Cooling and Storage
Proper cooling and storage ensure the longevity and safety of your canned goods.
- Check the Seals: Once the jars are cool, press the centre of each lid. If it doesn’t pop back, it’s sealed properly. If a jar didn’t seal, you can reprocess it or refrigerate and use immediately.
- Remove the Bands: After confirming the seals, remove the bands. This prevents rust and makes it easier to spot any failed seals later.
- Store Properly: Label your jars with the contents and date. Store them in a cool, dark place.
For more detailed guidance on the canning process, check out this comprehensive guide at Midwest Living and for specifics, visit the West Virginia University guide on canning.
By following these steps, you’ll ensure that your homemade preserves are safe, tasty, and ready for any emergency.
Common Canning Mistakes and How to Avoid Them
Canning is a fantastic way to preserve your harvest, but it’s easy to make mistakes if you’re new to the process. Knowing what to watch out for can help you avoid pitfalls that could lead to spoiled food or worse. Let’s go over some common canning mistakes and how to avoid them.
Not Using Proper Equipment
When starting out, it might be tempting to use whatever jars or lids you have lying around, but this can be a big mistake.
- Improper Jars: Reusing store-bought jars, like old pickle jars, isn’t safe for canning. They’re not built to withstand the high heat needed for canning. Always use mason jars designed for canning purposes.
- Wrong Lids: Make sure to use new canning lids each time. Used lids might not seal properly, risking contamination.
Using the correct equipment ensures your food is safely preserved. Refer to Simply Canning to learn more.
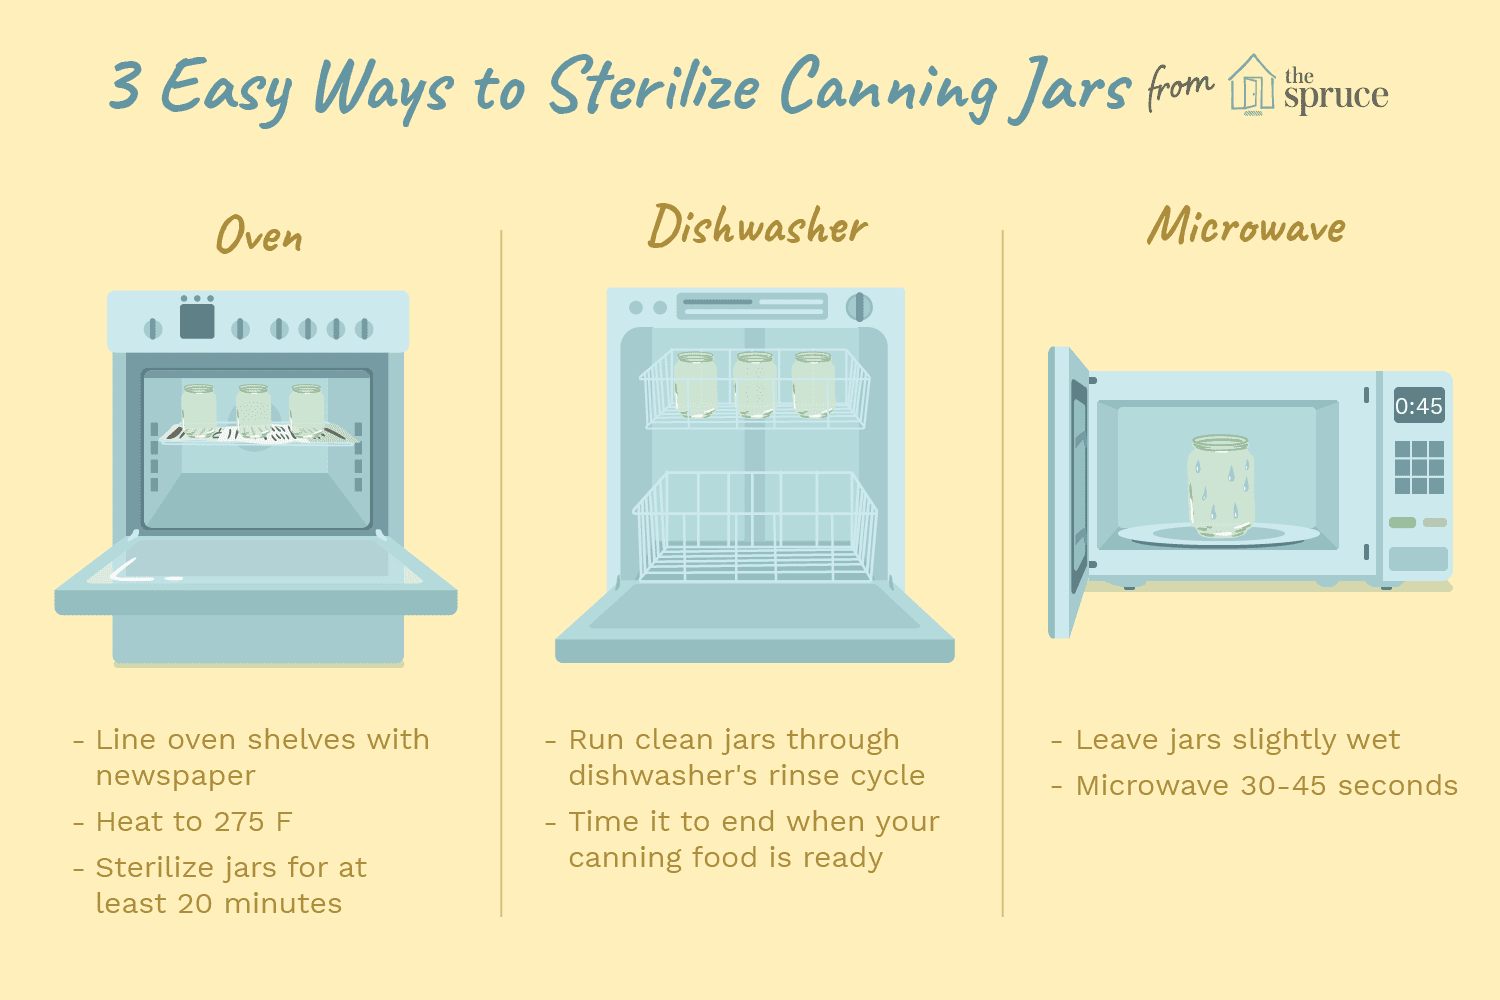
Not Sterilising Jars Properly
Sterilising jars before filling them is crucial to prevent contamination.
- Cleanliness: Wash your jars in hot, soapy water, and then sterilise them in boiling water for at least 10 minutes.
- Warm Your Jars: Keep your jars hot until you’re ready to fill them to prevent them from cracking when adding hot food.
Sterilising eliminates harmful bacteria. Follow the tips at Taste of Home for proper sterilisation methods.
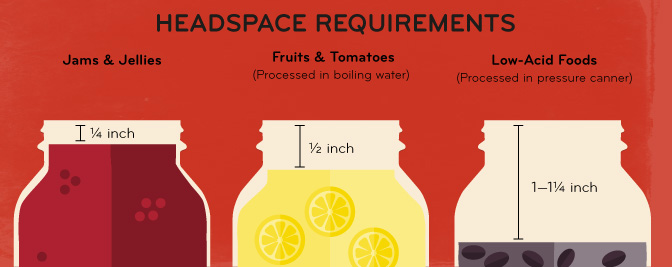
Ignoring Headspace Requirements
The space between the food and the lid, known as headspace, is critical to ensuring a good seal and preventing food spoilage.
- Too Much Headspace: This can cause the jar not to seal properly.
- Too Little Headspace: This can lead to food expanding and leaking during processing, which also impacts the seal.
Always follow the headspace guidelines in your recipe. For tips on maintaining headspace, explore Backwoods Home.
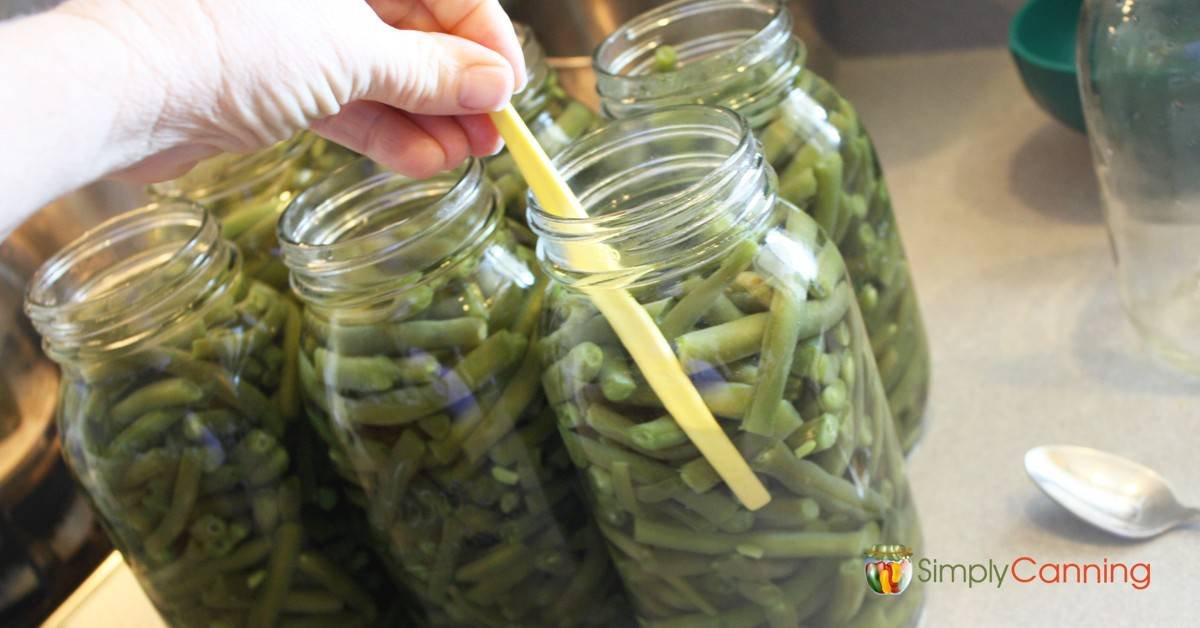
Not Removing Air Bubbles
Trapped air bubbles can affect the vacuum seal and the quality of your canned goods.
- Using a Bubble Remover: After packing your jars, run a bubble remover or a non-metallic spatula around the inside edges to release any air bubbles.
- Tapping Jars: Gently tap the jars to help any hidden air bubbles rise to the top.
Removing air bubbles ensures a stronger seal and helps prevent spoilage. To understand more about this, visit Homesteading Family.

Using the Wrong Processing Method
Different foods require different canning methods for them to be safe to eat.
- Water Bath Canning: Suitable for high-acid foods like fruits, jams, and pickles.
- Pressure Canning: Necessary for low-acid foods like vegetables, meats, and soups to kill any harmful bacteria.
Using the wrong method can result in unsafe food. Check out Practical Self Reliance for in-depth information on canning processes.
Storing Your Canned Goods
When you’ve put all that effort into canning your food, the last thing you want is for it to spoil because of improper storage. Storing your canned goods correctly is essential to make sure they stay safe and edible for the longest time possible.
Choosing the Right Storage Location
The location where you store your canned goods can greatly impact their shelf life. Here are some key tips for selecting the right storage area:
- Cool Temperature: Aim for a storage temperature between 10°C and 21°C. Extreme heat can cause the food inside the cans to spoil, while freezing temperatures can cause the cans to rust or the seals to break.
- Darkness: Light can deteriorate the quality of your canned foods, especially over long periods. Store your jars in a dark place like a pantry, basement, or interior closet.
- Dry Environment: Moisture can lead to rust on metal lids and jars, compromising the seal and making the food unsafe to eat.
For more specifics on proper storage conditions, you can check out this detailed guide.
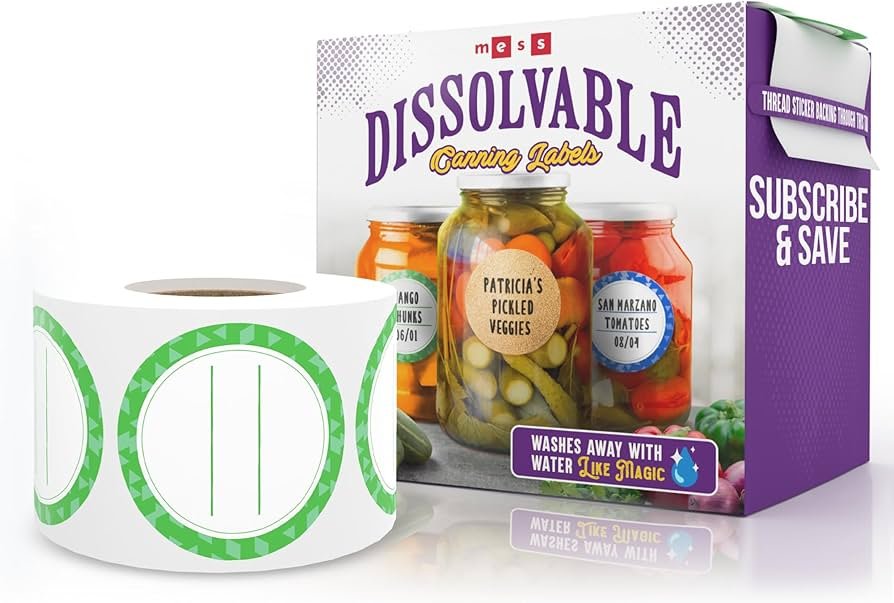
Labelling Your Jars
Labelling is a simple but crucial step that helps you keep track of what you’ve stored and when it needs to be used. Each jar should have:
- Content Description: What exactly is in the jar (e.g., “Peach Preserves”, “Tomato Sauce”).
- Date of Preservation: The date when the food was canned.
Using waterproof markers or pre-made labels can save you from smudges and ensure the information remains legible.
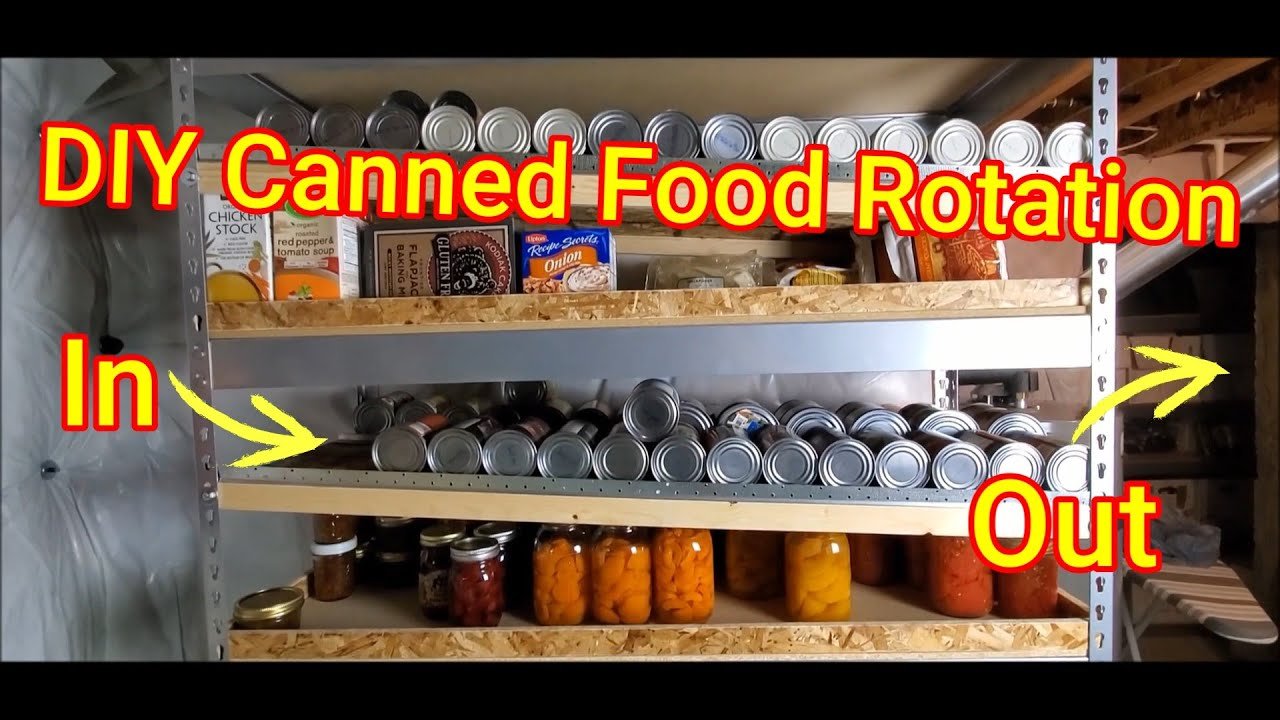
Rotating Your Stock
When it comes to using your canned goods, the rule of thumb is first in, first out (FIFO). This means the first items you store should be the first you use. Here’s how you can do it effectively:
- Organise Shelves: Place newer jars behind the older ones on your shelves.
- Use Jar Lifters: Special storage systems or jar lifters can help you rotate stock easily.
- Regular Checks: Periodically inspect your storage to ensure nothing is forgotten at the back.
For more tips on efficient rotation, consider visiting this helpful site.
Inspecting Canned Goods
Regular inspection of your canned goods can help you spot issues before they become problems. Check for:
- Rust: Look at the lids and the jars for any signs of rust.
- Bulging Lids: This can indicate a compromised seal and possible spoilage.
- Leaks: Any sign of leakage means the seal has failed, and the contents should not be consumed.
Ensuring your stock stays in good condition is a continual process. For a full checklist on inspecting your canned goods, refer to this detailed resource.
Best Practices for Long-Term Storage
For those planning to store canned goods for an extended period, here are some additional best practices:
- Avoid High Shelves: High temperatures rise, and storing jars too high can expose them to undesired heat.
- Use Food-Grade Plastic Bins: These can provide an extra layer of protection against light, moisture, and pests.
- Group Similar Items: This makes it easier to find what you need quickly and check for redundancy.
Implementing these practices will ensure your pantry is well-organised and ready to sustain you through any emergency. For more strategies on long-term storage, check out We Love Prepping.
Stay tuned for more tips on managing your prepper pantry to keep everything running smoothly!
Delicious Recipes to Get You Started
Canning your own food can feel like a big step, but with a few simple and delicious recipes, you’ll be filling your prepper pantry in no time. I’ll share easy-to-follow recipes perfect for beginners that cover a range of foods including jams, pickles, and meats. Get ready to enjoy the taste of homemade preservation all year round!
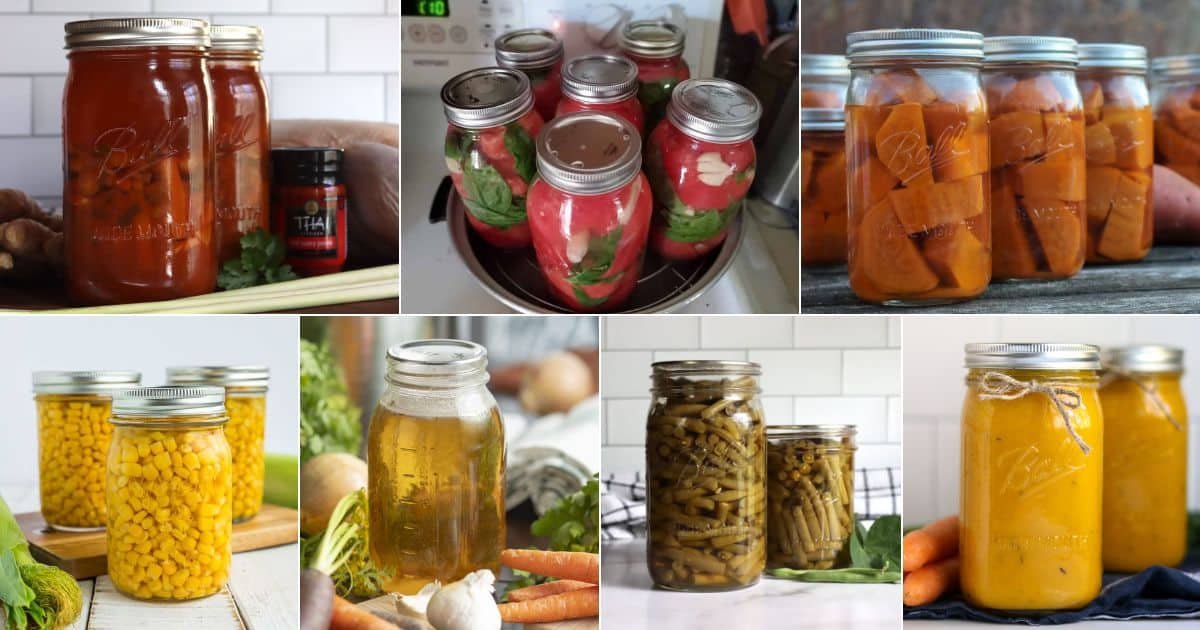
Strawberry Jam
Strawberry jam is one of the easiest and most satisfying preserves to make. This sweet spread is perfect on toast, in sandwiches, or as a topping for desserts.
Ingredients:
- 4 cups fresh strawberries (hulled)
- 4 cups granulated sugar
- 1/4 cup lemon juice
Instructions:
- Mash Strawberries: Crush the strawberries in a large mixing bowl until they reach your desired consistency.
- Combine Ingredients: In a large pot, combine the strawberries, sugar, and lemon juice. Stir over low heat until the sugar is dissolved.
- Boil: Increase to high heat and bring the mixture to a boil. Stir frequently until the mixture reaches 105°C.
- Sterilise Jars: While the mixture is cooking, sterilise the canning jars and lids by boiling them.
- Fill Jars: Pour the hot jam into the sterilised jars, leaving about 1/4 inch of space at the top. Wipe the rims, apply the lids, and screw on the bands.
- Process Jars: Process the jars in a boiling water bath for 10 minutes. Let them cool completely before storing.
A more detailed jam-making process can be found here.
Dill Pickles
Crunchy dill pickles are a fantastic way to begin your canning journey. These pickles are great as a snack or a side dish with your meals.
Ingredients:
- 8 cups cucumbers (sliced or whole)
- 4 cups water
- 4 cups white vinegar
- 6 tablespoons canning salt
- 2 tablespoons dill seed
- 2 teaspoons mustard seeds
- Garlic cloves (optional)
Instructions:
- Prepare Brine: In a large pot, combine the water, vinegar, canning salt, dill seed, and mustard seeds. Bring to a boil.
- Sterilise Jars: Sterilise your canning jars and lids by boiling them.
- Pack Jars: Pack the cucumbers tightly into the hot, sterilised jars. Add garlic cloves, if using.
- Add Brine: Pour the hot brine into the jars, leaving 1/2 inch of headspace. Wipe the rims, apply the lids, and screw on the bands.
- Process Jars: Process the jars in a boiling water bath for 10 minutes. Allow them to cool completely before storing.
Check out more pickle recipes and variations here.
Canned Chicken
Canned chicken is versatile and perfect for quick meals. It’s a great addition to your prepper pantry, providing essential protein.
Ingredients:
- 5 pounds boneless, skinless chicken breasts or thighs
- 2 teaspoons canning salt (optional)
- Chicken broth or water to fill jars (optional)
Instructions:
- Prepare Chicken: Cut the chicken into chunks or leave whole, as preferred.
- Pack Jars: Pack the raw chicken into sterilised jars, leaving 1 inch of headspace. Add 1/2 teaspoon of salt per pint jar, if desired.
- Add Liquid: You can add hot water or broth to fill the jars, or can the chicken without additional liquid – it will produce its own juice.
- Remove Air Bubbles: Remove the bubbles by running a non-metallic spatula around the inside of the jar.
- Seal Jars: Wipe the rims, apply the lids, and screw on the bands.
- Process Jars: Process the jars in a pressure canner at 10 lbs pressure for 75 minutes (pints) or 90 minutes (quarts).
For further detailed guides on canning meats, check out this resource.
Canning these beginner-friendly recipes not only stores up delicious food but also brings a sense of accomplishment and readiness. Happy canning!
Check our Canning and Preservation kit Below
Benefits of Home Canning for Preppers
Home canning isn’t just an enjoyable hobby; it’s a crucial skill for preppers, offering multiple benefits that commercial canned goods can’t match.
Cost Savings
One of the biggest advantages of home canning is the cost savings. By preserving your own food, you save money on grocery bills. Fresh produce, especially when bought in bulk or grown in your garden, is often cheaper than pre-packaged canned foods. Think about how much you spend on groceries. Reducing that amount can free up funds for other essential prepper supplies.
Control Over Ingredients
Canning at home gives you full control over what goes into your food. No more worrying about preservatives, artificial flavours, or added sugars. It’s a natural way to ensure food quality and tailor your pantry to your family’s tastes and dietary needs. Plus, having control over ingredients means better nutrition, which is vital in any emergency situation. According to the Wilderness Survival Guide, this control is a significant health advantage.
Preserve Seasonal Produce
Another excellent benefit is the ability to preserve seasonal fruits and vegetables. Store-bought canned food can be limited in variety and freshness. By canning your own food, you can enjoy summer peaches or fall apples year-round. This not only saves money but also ensures you have a variety of nutritious options available no matter the season.
Self-Sufficiency
Home canning enhances your self-sufficiency. You aren’t reliant on store supply chains, which can be unpredictable during emergencies. Your jars of home-canned food will be ready whenever you need them, offering peace of mind. Preppers often stress the importance of self-sufficiency, and home canning is a perfect example of this principle at work. As stated in We Love Prepping, mastering home canning bolsters your preparedness.
Environmental Benefits
Canning your own food reduces waste. You’re reusing jars, which minimizes the need for disposable packaging. This eco-friendly choice decreases your environmental footprint and aligns well with sustainable living practices common among preppers.
Customisation
Home canning lets you customise your food storage to suit your taste preferences. Whether you prefer your salsa extra spicy or your pickles sweet, you can make it just the way you like it. This makes for more enjoyable meals, even when you’re relying on your prepper pantry.
Long Shelf Life
Properly canned foods have a long shelf life, often lasting for years. This ensures that you always have a backup supply ready for any situation, whether it’s a power outage or a larger crisis. By rotating your stock, you can consistently have fresh supplies.
Homemade Quality
Finally, there’s nothing quite like the taste of homemade preserves. Canning your own food brings better flavour and texture than most store-bought options. It’s like bringing a taste of home into every meal you prepare.
By embracing home canning, preppers can save money, control their food supply, and gain the practical advantages of self-sufficiency. It’s an invaluable skill that turns your pantry into a powerhouse of health, variety, and preparedness.
Conclusion
Embarking on the journey of DIY canning and preserving is both rewarding and smart. Not only does it help in filling your prepper pantry, but it ensures you’re prepared for any situation. A well-stocked prepper pantry gives peace of mind and the satisfaction of knowing you’ve preserved your food with care.
By mastering canning, you’re investing in your family’s health and safety while enjoying the personal satisfaction of homemade goodness. Don’t wait for the next disaster; start preserving today and secure your food future. Happy canning!